HOME WELCOME SEVEN ELAN ELISE MIDGET TYPE R MINI LAND ROVER FAMILY MG TC GUEST BOOK
March April May June July August September October November December January February March April May June Tech. Index Gallery
(the months are 2015/2016)
The French Blatting Company
![]()
1949 MG TC
October 2015
01-Oct-15
Up early and in the workshop by 0800, Spent some time tidying up, got most of the wrinkle paint which didn't wrinkle off the wiper motor then then set too the brakes. I had to remove the shoes yet again. I was really struggling to get them back on so took them off and to the bench. When I studied them I could see that the vertical arm of the expander was catching on the clip that the end of the horizontal arm goes in. I took it off and straightend. It was the same when I refitted it so I took it off and left it off. I can't see that it does anything and it looks "twisted", the bent part that goes in the screw hole is offset and I think it should be straight. With it no longer there the shoes went on easily. The drum went on but when the hub nuts were tightened the drum locked. By this time it was 1300 so I broke for lunch. After lunch I set up the sand blaster and sand blasted the prop shaft. I did it today as it looks like this may be the last really dry day.
I then returned to the brake. I could see that the front shoe wasn't closing. I looked at it for a while then decided "when in doubt-clout". I tapped the shoe all the way, up, down. sideways and in. It then went "click" and closed up. I have no idea what it was caught on as there's nothing there but the drum went on and still turned when the hub was tightened. HOORAY
By now it was 1700 so I stopped, had a rest, shower and Lynne dressed my finger. It's much better now but will probably not be 100% for 10 days or so.
I asked the group about the wrinkle paint and many told me that I needed to warm the item and paint and then use a hair dryer on the paint when I spray it on. I'll do that, thanks to all who advised.
.jpeg)
The veritical arm on top of the clip.
.jpeg)
From a different angle.
.jpeg)
The clip with the expander removed. You can see where the expander is touching the edge of the clip.
.jpeg)
The clip, removed.
..jpeg)
The prop partly blasted.
.jpeg)
Not even half way, keep up Verona!
.jpeg)
Close up. It's not perfect, with lots of pitting but a coat of POR-15 and a top coat of gloss chassis paint will make it good.
Only the shock absorber arms and the track rod to do. Three days to do it so shouldn't be a problem. Maybe I shouldn't have said that.
02-Oct-15
Day started well and finished the shock absorber bushes on by 1130. We then took our guests (John and his wife, who sold me the car) to lunch as they decided to leave for St Malo on Friday to return the hire car and get the 1100 ferry Saturday. They would have had to leave at 0700 on Saturdy if they stayed overnight. We got back at 1500 and got a call from Lynnes sister to say that her father, (who was in hospital following a fall and waiting for a pacemaker to be fitted) had taken a turn for the worse. I got us on the 2300 boat from Ouistrham but got a call at 2330 to inform us that he had died. He was 90, had a good life and didn't suffer. We moved our hotel reservation from Derby to Sheffield and spent the weekend with our kids. Got back home at midnight on Monday 6th.
.jpeg)
Sorry it's a bit fuzzy. I have a rod of 25mm nylon which I turned down to 22.5mm and drilled a 12mm hole in.
.jpeg)
And this is how they fit. They are tight, very easy to push in and better than the rubber ones in my opinion. Norman Golm gave me the idea but he used plastic. I've used nylon as it will have a small amout of flexibility. I did the same on my A Frame bushes on the Caterham some years ago.
.jpeg)
They are tight but a few twists and the peg is moving fine.
04-Oct-15
In UK
05-Oct-15
In UK
06-Oct-15
Started early and got the track rod off without too much trouble. Got the paint off the threads (on the wire wheel, but I kept fingers out of the way). Refiited track rod and adjusted track by eye. Then took some picture of the tunnel for one of the TABC group. Finally painted the new nuts and bolts and other fittings that have gone on since painting the chassis. I'm going to the bodyshop for 1400 and will return with their breakedown lorry to take the chassis there. Then I can start on the engine and gearbox. Pictures of the transportation later.
.jpeg)
.jpeg)
The tunnel
Got to the bodyshop at 1430. They started work on the Mini, fitting the two rear exhaust mountings, while Jean-Luc got their small breakdown transporter out. I got back, reversed down our drive (about 300 metres) and then pulled, manually and with the Land Rover, the chassis into position. I pulled out the two ramps and unwound the winch. Tied around the front cross bar the chassis was pulled onto the bed. I then put a rope on it and moved the wheel braces to lock the front wheels. Made my way back and unloaded.
Got back here at 1700 and had to make a phone call and other bits and pieces. Got into the workshop for 1800. Jet washed the engine and got the head off by 1900. I'l finish the strip down on Thursday, we're out tomorow. Have to go the prefecture at Angers to get the new French registration for the Land Rover, I've had all the paperwork since July!
.jpeg)
.jpeg)
Backed up to keep it off the wet grass. Undoing the winch.
.jpeg)
.jpeg)
Heave ho!
.jpeg)
.jpeg)
Who? Me? Let's get the Land Rover to do the hard work.
.jpeg)
.jpeg)
.jpeg)
.jpeg)
.jpeg)
.jpeg)
.jpeg)
.jpeg)
.jpeg)
.jpeg)
.jpeg)
.jpeg)
.jpeg)
.jpeg)
.jpeg)
.jpeg)
.jpeg)
.jpeg)
.jpeg)
.jpeg)
.jpeg)
.jpeg)
.jpeg)
.jpeg)
.jpeg)
.jpeg)
.jpeg)
.jpeg)
.jpeg)
.jpeg)
.jpeg)
.jpeg)
.jpeg)
.jpeg)
.jpeg)
.jpeg)
.jpeg)
.jpeg)
.jpeg)
.jpeg)
.jpeg)
.jpeg)
.jpeg)
.jpeg)
.jpeg)
.jpeg)
.jpeg)
.jpeg)
.jpeg)
.jpeg)
.jpeg)
.jpeg)
.jpeg)
.jpeg)
.jpeg)
.jpeg)
.jpeg)
.jpeg)
.jpeg)
.jpeg)
.jpeg)
.jpeg)
.jpeg)
.jpeg)
.jpeg)
.jpeg)
.jpeg)
.jpeg)
.jpeg)
.jpeg)
.jpeg)
.jpeg)
.jpeg)
.jpeg)
I hope the above are self explanatory. I asked Lynne to take a few pictures of me loading the chassis onto the lorry. I didn't exactly mean 90 pictures but as she took the trouble to take them I thought I'd better publish them. Thank you darling for recording the event.
.jpeg)
.jpeg)
The rocker shaft and tappets. The engine minus the rocker shaft
.jpeg)
.jpeg)
The cylinder head from both sides.
.jpeg)
A headless engine.
On Thursday I'll drop the sump and remove the rods and pistons and start cleaning and order the parts I need.
07-Oct-15
Busy day. Got to the Prefecture at Angers at about 1000, waited 20 minutes and presented all the documents for getting a carte gris (French V5c) for the Land Rover. She was surprised it was all there. 5 Minutes later I'm paying my cheque for 318.80€ and I have a paper wirh the number on it. Get a coffee then off to the the new shopping centre for a SIM card for Lynne's new phone. They can't do one, must go to a service provider. Then down the motorway to Nantes and lunch at a restaurant opposite IKEA. An hour in Ikea for blankets, hangers and a plastic box (for us-the box is for washing engine parts), a toilet seat (for gite). We did want 4 folding chairs but they were in a restricted area of the warehouse and there was a queue so we left it. Back to Chateaubriant and got the SIM card in Orange. On to the chemist for my prescription and then to the physio to make a new appointment having missed the Monday one. Got back at 1800 - exhausted!
Found time to make a valve and valve spring stand though.
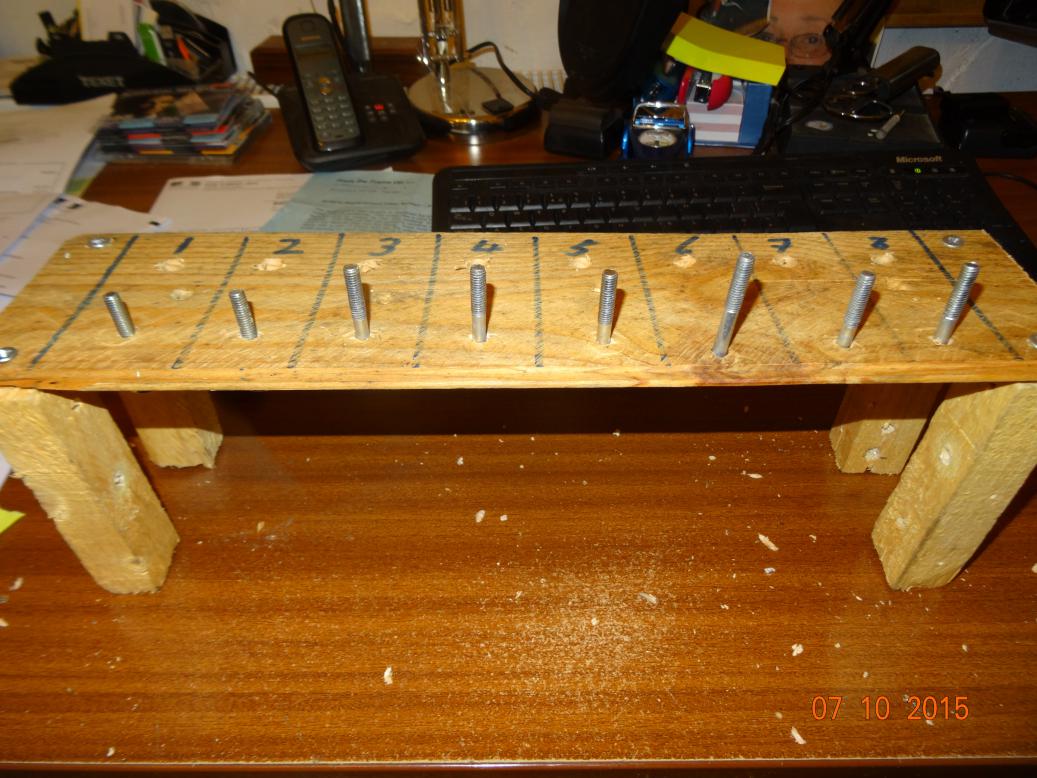
There are holes for the valves and the springs go on the coachbolts.
Engine will be in pieces by tomorrow night.
08-Oct-15
This is Radio MGTC, here is the midday news. The engine is stripped and all is well. The pistons are +.030" and are OK as is the bores. The crankshaft bearings and crankshaft are in very good condition. The valves and guides will need cleaning before a bulletin can be issued, but it is hoped they are well. Tune in tonight for a full report and pictures from the scene.
+++++++++++++++++++++++++++++++++++++++++++++++++++++++++++++++++
This is the evening news. Some parts of the engine have had the first clean. It's in good condition and, so far, all I will need is:
| Cheese head screws for w/pipe elbow |
| water pump |
| fan blade screws |
| Lockwshers - all |
| Locking wire |
| cam followers |
| Crankshaft bearings |
| con rod bearings |
| valve springs set (inner and outer) |
| rocker shaft |
| washer-rocker shaft |
| rocker bush short |
| rocker bush long |
| 1st motion shaft pilot bush |
| piston ring set +.030" |
|
complete engine gasket and seal set. timing chain, tensioner spring and oil pump kit |
.jpeg)
I put longer bolts on the carrier for the springs
.jpeg)
Yesterday morning I poured 2 litres of petrol into the sump. Worked a treat, the old oil just ran out.
.jpeg)
This is what I found when the thermostat housing was removed.
.jpeg)
The water pump impellor.
.jpeg)
The block where the water pump goes.
.jpeg)
Taking the valves out.
.jpeg)
With the pressure plate removed the centre plate is rusted to the flywheel. Came off easy enough with a tap.
.jpeg)
Crank looks clean enough
.jpeg)
But the sump has 1/4" to 1/2" of sludge at the bottom.The shiny strip above the pickup is wher I've rubbed my finger.
.jpeg)
This shows it better.
.jpeg)
Con rods are all marked 1,2,3 4.
.jpeg)
This is number 2. Can you see it?
.jpeg)
Top of the piston showing it's had a +0.030" (30 thou) rebore.
.jpeg)
Bore is good, will be better when it's been cleaned with fine wet and dry.
.jpeg)
One of the valves. I was going to turn the picture round but then thought it would still look like a valve. The valves are all good and so are the guides. Just need a grind in but won't need much as all the seats are as good as this one.
.jpeg)
After a first wash in petrol and a spray with degrease. I'll clean it more next week.
.jpeg)
The rocker shaft before dismantling. I've ordered a new shaft and bushes.
So, a good days work. I had to go out at lunchtime and lost two hours so I'm pleased I got as far as I did.
Tomorrow I'll decoke the head and lap the valves in. Then carry on cleaning and running pipe cleaners through the oild galleries and oilways.
09-Oct-15
Started early, 0745 and had a tidy up and put all the tools away. Then set up the head on the bench and cleaned it and ground the valves in. Finished about 1530, cleaned the distributor and then cleaned the crankshft and ran an oilway cleaner through the oilways. Then took some measurments of the tunnel for a TABC member and came in.
.jpeg)
The main and big end bearing shells. I'm fitting new but these are (were) OK.
.jpeg)
Top of the head after cleaning. The green tinge is caused by the lighting, it's not that colour really.
.jpeg)
Close up just to show how clean I got it after it has been laying in gungy oil for 48 years.
.jpeg)
Spark plug side. Note the oilway cleaning pipes at the top.
.jpeg)
Business end.
.jpeg)
It's so clean I had to take two pictures.
.jpeg)
The ins and out side.
.jpeg)
Valves ground in. The marks on the exhaust seat are just that, marks in the metal, not pitting.
.jpeg)
Poppets.
.jpeg)
The distributor. I cleaned the points on an oil stone and set the gap (0.012") The weights and springs look good and the shaft has no play so I'll leave well alone.
.jpeg)
The crankshaft with an oilway cleaner in one of the galleries.
.jpeg)
I knew you wouldn't see the cleaner, so I took a close up.
.jpeg)
Only this lot to clean now. As well as the block of course. I've poured a litre of pertrol into the sump to dilute the sludge.
PS. The above took much longer than it should due to my damaged finger from a week ago (or was it two weeks ago). I have a bandage on my right hand finger which makes it difficult to wash parts with petrol and lap valves in with one and half hands.
10-Oct-15
I went shopping at 0900 as Lynne's feeling a bit down. Got back and decided as I felt I was running on 4 cylinders and very low on petrol I'd have a day off. Went to bed at 2100 and slept all night until 0800.
11-Oct-15
I'm having another day off. Back to work tomorrow when I'll finish cleaning the engine parts.
12-Oct-15
It's only a small wound, really, it isn't that bad. Having got the middle finger on my right hand nearly healed, I stuck the middle finger of left hand into the wire brush on the grinding wheel. Took the skin off the tip which wasn't that bad, but trying to clean around it with surgical alcohol was a scream-literally, I screamed out loud and quickly stuck my finger into a tub of Sudocreme.
OK, I started at 0930 and spent the day cleaning all the engine bits. When I drew the pistons last week I thought they were OK, but when I cleaned them I found they were scored. Oh well a new set of pistons.
I have a friend in Nantes (about an hour and a half from here) who has a TC and I'm going to do some work on it for him. He brought it over yesterday with a friend of his to take him back. The friend is a really nice chap and tells us he has 8 vintage lorries. I then tell him about another friend of ours who lives 60 kilometres past Tours, over 2 hours away. We went there in the summer and went to a museum with old lorries in. He then tells me the name of the town and the museum and explains that three of the exhibits are his, on loan to the museum. Small world!
So, this is todays work.
.jpeg)
One pushrod with a black carbon film (from mineral oil) and the other cleaned on the wire brush.
.jpeg)
Halfway there. It took ages to get them clean.
.jpeg)
This is a selfie.... with a difference. The glove is to keep the petrol off my finger with the bandage. This was before I stuck my other finger into the wire wheel.
.jpeg)
All done.
.jpeg)
The flywheel after cleaning with a scraper and fine emery cloth. It was very rusty before.
.jpeg)
The sump after cleaning. The gasket faces have been scraped and the inside has been washed in petrol and degreaser. If I had an acid bath I could get it cleaner, but this is OK.
.jpeg)
The outside. This will get a new coat of maroon paint, as will the rest of the engine.
.jpeg)
The inside of the timing cover. I had to wash in petrol then scrape with a small screwdrive blade and finally clean with the degreaser. I'm pleased with the final finish.
.jpeg)
From another angle. I sometimes take two pictures because of the shadows from the workshop lighting.
.jpeg)
The external oil pipes, oil filter clamp and dynamo bracket. I thought the pipes were copper and wasn't going to paint them (as they should be). But they are steel so they will get painted but the brass unions won't.
.jpeg)
The oil pump faces cleaned. The oil pump gears are not showing wear so I'll keep them, only changing the relief valve spring.
.jpeg)
The pump from the inside.
.jpeg)
This pipe is copper with brass unions. It will not get painted as I love copper and brass pipes, highly polished.
.jpeg)
I thought the pistons were OK when I drew them, but after cleaning they are all scored.....
.jpeg)
.... this sides worse. Also some have broken rings which may well have caused this. The bores seem OK but I'm cleaning the block tomorrow so I'll have a good look.
.jpeg)
Various nuts, bolts and screws spending the night soaking in petrol.
.jpeg)
The cleaned stuff laying on an old towel which folds over to cover them. For those discussing what was painted and what was not you can see the timing cover was painted. However there is no sign of paint on the two sides of the head. The ends are painted but if the factory painted the engine after the mainifolds were on they would not have got to the side showing. The pictures above show no signs of paint on the sides. I'll have a good look at the sides under a strong lamp tomorrow.
ENGINE REBUILD CARRIES ON HERE
13-Oct-15
Left home at 0730 and was outside the motor factor at Segre 15 minutes later. They opened at 0800 and I got my number plates for the Land Rover. I also got more degreaser but it turned out not be what I needed so I'll get more tomorrow. Then to the bank to get some money for the bodyshop (I thought they wanted cash, but next month I'll give them a cheque or card). Took the new rear quarter panels and the running board fitting kit which they will need the long bolts from. Then home.
Started cleaning more parts and worked until 1600. Did the block with petrol but it will need the degreaser to finish off.
I was supposed to inspect the cylinder head to see if I could find some paint on it, but didn't get time. I had asked the TABC group what parts of the engine are painted and there must be about 60 emails on the subject. I'm sure my head has no paint on it but it was probably acid dipped when the engine was overhauled in the 1960s and the paint removed. I'll be painting the head.
At 1600 I started work on a friends TC. There is a list of work but I started on the N/S rear hub. The hub slides off the half shaft without any effort and there is also an oil leak from the hub. I have a new hub to press on but Renaud found another hub in his garage. This hub is also worn and will slide on to the hub easily. So, I pressed the new hub on. Took 3 tonne to press on, which is not as much as it should be but will be OK. The hub only had half a gasket on it and I thought that was why it was leaking. The flange was covered in black silicone goo which took 10 minutes to scrape off. Then I noticed that at some time, someone had been hitting the flage and it had a bur which would have left a gap on the two faces when tightened. I filed it flat, applyed blue hylomar (no gasket) and refitted the hub. I also adjusted the brake. Next job will be the carbs. I'll do that on thursday as we're out tomorrow.
.jpeg)
The bodyshop have this gem in for work. It's a Citroen SM and, in my opinion, had Citroen called it a Maserati (they owned Maserati at the time) or created a premium brand, it would have many more than it did. Not sure people wanted to spend that much on a Citroen, even though it was a fantastic car.
.jpeg)
Engine compartment with the V6 well back and the green spheres that control the hydro-pnumatic suspension. Even the doors are operated by this system.
.jpeg)
The Maserati V6.
.jpeg)
Back to reality. The glass bead I had in the blast cabinet was really worn out and was almost dust. I took two bucket fulls out and put some aluminium oxide in.
.jpeg)
The tappet case after blasting. This was a thick caking of crusty oil residue before.
.jpeg)
Con rod caps after cleaning
.jpeg)
Main caps after cleaning.
.jpeg)
Half shaft being pressed into new hub.
.jpeg)
Only 3 tonne pressure required. Should be more but I think it'll be OK. When all reassembled the movement that was there before has gone.
All-in-all a good days work. As well as this I spent half an hour on the phone and all the engine parts are on the way. Moss Paris have sent the Graphite and red Hermatite I ordered 3 weeks ago along with another tin of red paint for the grille. They had said it would be 6 weeks. I'm expecting it all to be here early next week and I can then rebuild the engine.
14-Oct-15
Got up early so did this: https://youtu.be/cCvoo3dvO_w
Went up to see our friends who live near Dinan. Went for lunch by the river, all very nice. Then to an optician for an eye test. After half an hour of tests he declared he couldn't do anything as everything he tried had no affect. It's as I thought, the hormone problem. I'll just have to wait until the level comes down and my sight will go back to normal. Got home at 2010 and as we got out of the car the space station was flying overhead.
15-Oct-15
Started at 0800 and took the head studs out of the block and cleaned the face of the block and the studs. I bought more spirit based degreaser yesterday so did a bit more degreasing of the tappet chest.
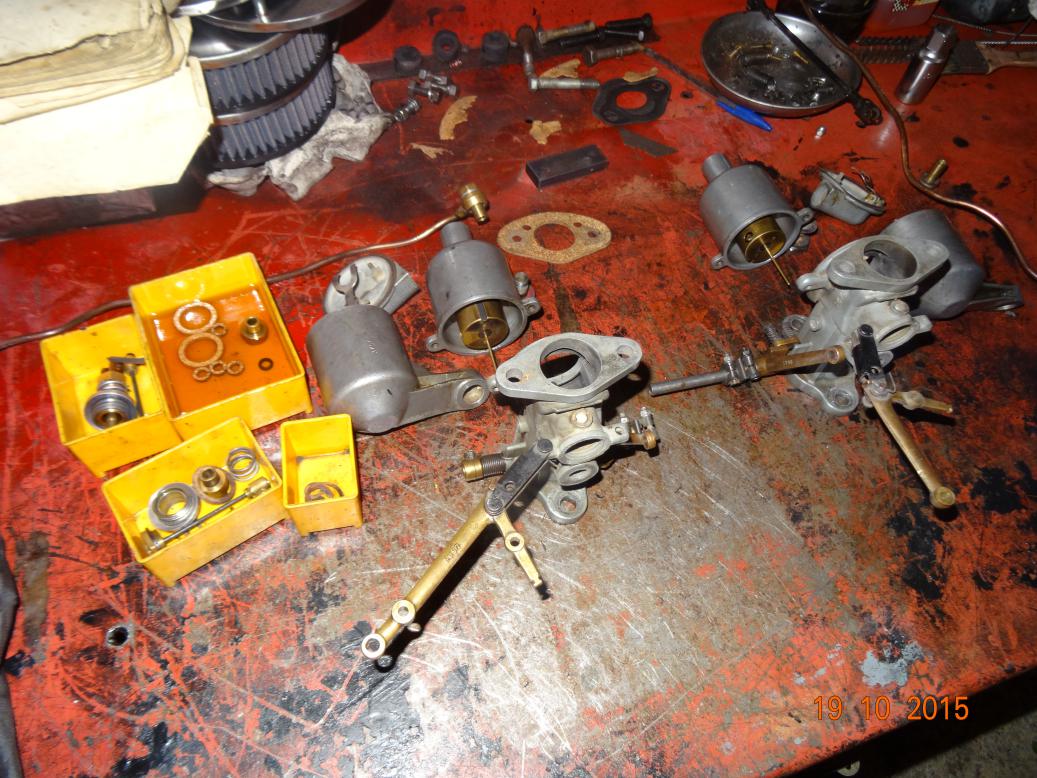
Then took the carbs of my friends car and stripped them. Now, let me explain, my friend is not a mechanic. I know he's brillant at the job he does but he's not a mechanic.
One carb had the jet assembly incorrectly assembled and the other has the two cork seals and tapered washers missing. The needles of both weren't alighned (I didn't check if the jets were). A few weeks ago I noticed the vacuum takeoff in the manifold was open. I put a screw in it as a temporary repair. The engine was now running rich, the performance was terrible and it used petrol like a 7 litre Yank Tank (apologies to our US cousins). I ordered two new gland kits and a new tappet adjusting screw which, I'm told, has the screw driver slot broken (I hope the broken bit isn't floating around the engine!)
Then I took the right hand front wheel off. The wheel bearings are shot, a lot of movement and a rumbling noise when turned. I'll add new ones to my order for the engine parts. The carb stuff is on it's way as I couldn't wait. When I went to tighten the wheel bearing I found the split pin hadn't been turned over. Took the drum off and found a real mess with split pins and parts of carpet fixing. I put that right and refitted the drum, and hub nut split pin. Then checked the shock absorber and topped it up. It's good on this side. However the bottom link was loose on the axle because there was no washer on the threaded rod. I refitted with correct flat and spring washers and it's now no longer loose.
Moving to the other side I cannot get the drum off. It's so tight it feels like it's still bolted up, which it isn't, all 6 nuts and spring washers have been removed as well as the two screws. I took the shock absorber arm off and it just moves up and down with no resistance at all. Topped it up and the flud starts running out as fast as I'm pouring it in. Off comes the shock absorber, to the bench and core clug and end caps removed then to the press to press the arm out.
I'm getting too old for this! It's 1700, I'm tired my back hurts and I'm trying to get the shock absorber on the distance pieces to press the center spindle out and every time I let go to pump the handle of the press the shocker falls over. I tried for 40 minutes and then packed up, went in and washed. Lynne will help me in the morning.
.jpeg)
The block with cleaned face. The tappet chest will need more cleaning.
.jpeg)
Studs, before and after.
.jpeg)
ENGINE REBUILD CONTINUES HERE
Carbs, ready to be removed.
.jpeg)
Manifold with carbs removed. You can just see the black self tapper I screwed into the open vacuum connection.
.jpeg)
The wider picture
.jpeg)
When I first started work at University Motors, my mentor, Jimmy White told me "you can always tell a mechanic by the way he does split pins". This is not the way.
.jpeg)
Nor is this, but does look funny.
.jpeg)
This is the carpet fixing ring that was used behind the split pin.
.jpeg)
I replaced the washers and fitted new split pins. This isn't the correct way to fit the pin, the end should be spread in a V shape but I do it this way where someone could scratch themselves (normally me) on the end of a pin.
.jpeg)
This is the other side, better?
.jpeg)
I think the leading shoe has had a piece welded on because the wrong wheel cylinders have been fitted. They work and adjust Ok so "it aint broke, don't fix it"
.jpeg)
The gunge that was in the shock absorber.
I didn't take any pictures of the carbs spread out on the bench. I'll try and remember tomorrow.
Members of the TABC group can take note that the head on this car isn't painted. However, no more updates on engine colours, battleships, tanks and old paint lying around.... Please!
16-Oct-15
Before I start today's tale I would like to explain to my nameless friend that it is a pleasure for me to help out and sort his car out. My trials and tribulations are not to do with me doing his car but me alone. I'm laughing about today already.
OK, started at 0900. The drum still wouldn't come of and I was hitting it harder than I thought I should. I got the oxy-acetylene plant out and heated the drum around the studs. Still wouldn't move. I then took the hub nut off and removed the hub with the drum. I put it on the bench, put the 6 nuts back on so they were level with the studs (to protect the threads) and had to really hit it hard with a big lump (club) hammer to get the hub away from the drum. The flange had what looked like varnish on it so I washed it all in petreol and then scraped it with a razor blade. I also cleaned and scraped the hub. I then changed the split pins and removed the carpet stud rings. When I refitted the washers and split pins I noticed the fulcrum pin at the bottom, where the shoes are held to the backplate had a circlip, not a horseshoe clip on. I removed the circlip and fitted a horseshoe (I have some in stock now). It had noticed the shoe spring was pulling the shoes inwards so they were not parallel with the drum surface. I looked at the spring and compared it to the ones I have over from mien. It was far too strong, so I changed it for mine. Then it dawned on me the reason was there was no Thackeray washer behind the shoes.
All this was going on in a Fairley dark area of my workshop, a place normally used for parking not working. I had a light but it was useless. I don't know if it's only me but I cannot find a decent lead light that you can direct the light where you want and doesn't shine in your eyes all the time. Actually, I saw the mechanic at the bodyshop had a small LED torch which is designed to be used as a lead light. I was impressed by it so bought one. 89€ and made by Philips. It's very good but only gives a beam or a wider flood and I wanted to light up the corner where the car was. If I hadn't been so lazy I would have brought the halogen flood lights over. Of course, had I realised I would have had so much trouble, I would have
I rang NTG to ask them to add a Thackeray washer to the parcel of engine bits. They haven't got any and are in the process of finding someone to make them. No one else has them and most of the other suppliers in the UK will buy from NTG when they get them made (One good reason why some of the parts are so expensive). So, I have to come up with a solution until the washer becomes available in several months’ time. I removed the split pin and washer from the shoe retaining clip and packed it with fibre washer to the extent that the shoe is against the backplate but still free to move. Ready to put the drum back, but first test if it goes on and off the hub, (which was still off), easily. No, it's still very tight to get off after knocking it on. I ended up filing out the 6 holes and the flange before it would come off without being hit with a huge hammer. I Refitted the hub and then the drum. Tightened the 6 nuts and the drum spins 3/4 of a turn then locks up. Take it off again and inspect. Can't see anything wrong with the shoes so put it back. The same so take it off. Close inspection shows the rim of the drum has been bent in from the hammering when getting it off and it's catching on the backplate. It's now about 1500 (had my hours lunch between 1300 and 1400). I am trying to hold the drum and hit the inside of the rim with a hammer and drift to get it back out. Impossible! So ask Lynne to help. She does a marvellous job of holding the drum on the flat of the vice whilst I straighten it. Looks OK so refit it. The same problem. Get my new LED torch and look closely behind the drum to see where it's touching the backplate.
I've mentioned before about my eyesight which is being affected by my medical condition. Well today it was very bad and I was having a lot of trouble seeing the details. It was very difficult to see where the drum was hitting the backplate. Eventually I worked it out and marked the drum with a marker pen. Got the drum off and in so doing rubbed the marks off. So refitted the drum and made more marks but all across the drum to the centre. Drum off, I could see the marks. With Lynne holding the drum I straightened the rim. This time it was OK. Refitted the drum, adjusted the shoes and then, at 1600 started what I was going to do in the morning, remove the cross shaft from the shock absorber. I needed Lynne to work the press handle whilst I held the shock absorber in position on the plates and with the bolts and long wheel nits providing the gap I needed to press the shaft out. After a few minutes of me shouting and swearing at the wheel nuts, which kept falling off, we got in position and the shaft popped out at 5 tonne pressure. The inside of the shocker was rusty and full of thick gunge (not sure what that's called in French…. or in American). Spent best part of an hour cleaning it all up and removing the hardened, rotten seal from the housing. At 1700 I packed up and left it all soaking in petrol. I'm going to the bodyshop in the morning to get some BSF screws and bolts for the car (all my BSF bolts are there as they will need them when they fit the body together). I need a correct size bolt for the carbs to manifold and a small screw to blank off the vacuum outlet in the manifold. I'll then have the rest of the day off and watch the football scores as they come in on "Final Score" I'll rebuild the shocker on Sunday and refit it. I'll also look at the left hand front spring shackle which is moving up and down when I lift the axle by the hub.
.jpeg)
As promised a picture of the carbs in bits.
.jpeg)
The shoe retainer packed with fibre washers.
.jpeg)
Close up.
.jpeg)
The inside of the shock absorber.
.jpeg)
And, now, soaking in petrol overnight (well until Sunday, so over two nights)
I feel better now and am chuckling to myself about today. I'm really hoping the pills I'm on work and I get back to normal before too long.
17-Oct-15
A day off. I went to the bodyshop and brought my stock of BSF fixings back, then got the car washed and did some shopping for Lynne. In the afternoon I slept through the football scores on BBC "Final Score"
18-Oct-15
Started at 0930 and rebuilt the shock absorber. It doesn't work! I've filled it whilst stroking the arm, to get the air out and I've removed the end caps to fill both sides but it still has no resistance. I left it in case any trapped air would come out while I had lunch and got on with some other jobs. Easiest thing to explain what I've done and found is to copy the progress report I've sent my friend.
Rear hub - Done
Carbs – waiting for parts
- I think there is a play at the rear of the prop shaft (universal joint). In my mind at least it needs checking. – not checked yet, will do when I’ve finishad at the front
- My leafs may be very worn out. How to know for sure ?? They’re not perfect but probably not worth spending money on.
- My bonnet is not well adjusted with the rad (there is a too wide gap between the bonnet and the scuttle top). The rear bracket is missing, see below for price.
- My handbrake needs retightening – will do when I get the back jacked up.
- The plate behind the tail lights and number plate is broken - done
- The spare wheel carrier misses a bolt - done
- The doors hinges have a big play – done. I have fitted wood screws to drivers door as the nuts are missing from the machine screws and they are inside the ash (wood) frame. You need new door hinge ball kits – see below.
- The wood board in the trunk is not correctly fitted (I don’t have the good wood screw) – will do when I get the back in the air. Saves my poor back …..
- The aero screens are not well secured (specially the right hand side one) – done, three of the screws had no nuts on them,
- I do not have turn signals because I did not buy the relay that is needed (my loom is designed to include turn signals inside the tail lights) as don’t know how to install it. I would like to fit a US product which is sold for MOTO. It is electronic self-cancelling unit which is operated by two touch buttons. One touch puts the indicator on for 7 seconds, then there are two longer presses which hive longer flashing. I have one on the Caterham and will show you when you are here.
- The brakes aren’t safe. They sometimes don’t brake “straight”. May be I should change the front wheel cylinders : they are not original but to change them I would need to change the copper tube and connections… The front cylinders are wrong and the shoes have had bolts welded on the end to fit the cylinder. It should be OK, let’s finish the rest.
- It needs a (second hand preferably) supercharger !! ? An English T-typer living in France made a nice movie on you tube to explain how he mounted it. You’ll be very lucky to find a second hand one, and if you do it will probably be worn out.
I’m having a problem with the shock absorber. I’ve rebuilt it but it is the same (not leaking, just no resistance). I don’t think there is anything missing from the inside and it may be I’ve got an air lock (air trapped in the bore). I’ve pumped it for ages to get any air out but it hasn’t made any difference. I’m going to ask the group for ideas.
noticed the front spring shackle on the left hand side was loose. When I went to tighten it I found the cross tube is missing. This will allow the chassis to flex at the front. I would get a new one fitted.
Parts prices. (Moss prices so may get cheaper from others)
Door hinge kit 401-878 £39.95
Rear bonnet mounting brackets 407-200 (outer) £9.76, 407-300 (inner) £1.25
Front chassis cross member 451-190 £73.25
Road springs front 454-430 £94.94 x 2, rear AAA848X £149.94 x 2
.jpeg)
A Thackeray washer....
.jpeg)
....and a view from the side.
.jpeg)
A troublesome shock absorber.
19-Oct-15
Started early, about 0800, and took the end caps of the shock absorber. Then decided that it must be the pins I've been told about by the TABC group so I took the shock absorber to pieces again. Now I could tell you that I had to machine a metering pin, adjust the by-pass valve, tighten the giggling pin on the laughing shaft but I'll tell the truth. This idiot put the return valve shims on top of the pins instead of under them. I really must stop working when I get tired and my back is hurting, it's difficult to think when you're in that state. Corrected them and rebuilt. Worked a treat so it went back on.. I let the front of the car down and jacked the back up, adjusted the RH rear brake, adjusted the handbrake cable and checked the rear UJ (it's fine). The handbrake cables aren't though. One has the adjusting threads almost flat so the nut is very difficult to turn and the other cable must be stretched and fraying. The nut is almost fully on and it has a heavy spring on the end of the cable to pull it back. This indicates to me that the cable is frayed at the brake end and is binding in the outer cable.
I then cleaned the plugs and points and set the points to 0.012". I cleaned up the distributor base plate and the inside of the cap which had a film of oil on them.
Then had nothing to do as the carb kits haven't arrived. They were at Charles De Gaulle airport Friday night so I guess the French post office don't work over the weekend. So I fitted the new French number plates to the Land Rover.
Then got the crankshaft on the bench and cleaned the flywheel flange ready for the seal kit to be fitted. After that I cleaned the sump bolts on the wire brush (it's OK all my fingers sutvived the ordeal) and refiitted the deflector plate to the sump.
So, with no parts and no more I can do I packed up at 1600 and fitted the two new PIR lamps inside the kitchen cupboard with the whirly wheel.
So, at the end of the day, the carbs all laid out waiting for the gland kits to arrive so I can rebuild them. Our post arrives at 1600 so I won't get finished tomorrow.
20-Oct-15
I've got shiny nuts! With no parts I decided to clean all the valve gear and the engine nuts, bolts and screws. After going into town and getting my blood test, posting letters and buying more bndages and stuff for poor fingers, I got to work about 1030. All my fingers are intact, with a few slight grazes but no more plasters. Finished at 1500 and now posting this after which we'll go to Angers to collect two buckets of aluminium oxide for the sand blast cabinet and have a Chinese in Attol. Hopefully the carb kits will be at 1600.
.jpeg)
Valve gear before...
.jpeg)
..... and after.....
.jpeg)
..... and more.....
.jpeg)
.... and all of it.
.jpeg)
All the shiny nuts, bolts and screws.
ENGINE REBUILD CONTINUES HERE
POSTSCRIPT: The carb kits haven't arrived. They were at Charles de Gaulle on Friday night. I would have thought they would be delivered on Monday. I had them post them as I wanted them before the engine parts arrive (the carb kits are for my friends car). At this rate the engine parts will be here before the carb kits.
21-Oct-15
A comedy act today. We took Lynnes car in for it's CT (French MOT) and left it there. then had a coffee in the cafe, followed by collecting my blood test results. Then, at 0930 I had my weekly physio for a frozen shoulder. It's our day out together and we're supposed to have a relaxing day. However, today we had to go to Ikea to get a copy invoice from July 2011. I wanted to get back for 1600 to sign for the carb kits so I had them for tomorrow. Lynne was getting upset (and rightly so) because I was shouting at the slow drivers holding us up and then wanted to fly around Ikea at the speed of sound so we could get back. I decided to take it easy and if we got back in time OK and if not....well, tough.
Ikea couldn't find the invoice so we have to get the credit card bill it's on so they know what date to look through. Problem is I can't remember what card we used and I'm guessing it was July 2011. So I rang MBNA when we got back to see if they could look back that far. Their system only goes back to September 2011 so I have to write in requesting a July 2011 copy statement. In case you're wondering why I need this, it's because the fridge we bought has broken and the espresso machine takes 20 minutes to fill a cup. I have found out that the electric items from Ikea have a 5 year warranty. But I need the invoice to action it.
Dropped Lynne off to collect her car and drove like a looney to get back here before the post arrived. I had assumed it would need signing for. I got back, opened the post box and there was my package with the carb kits in.
I'll have to take my darling wife out as an apology for being an idiot today (she says I'm an idiot every day, she may well be right).
22-Oct-15
0800 saw me rebuilding the carbs (off my friends TC). Finished by 0930 and then had a nightmare 2 or 3 hours. Refitting the carbs, a 20 minutw job. took 3 hours. I dropped every nut, bolt and screw I was refitting, Two carb to manifold bolts would not go in, I couldn't find the right tools, which were laying right in front of me. I had an early lunch then carried on. One of the problems was that the car was not under any lighting and the new leadlights I bought at Machine Mart just blinded me and didn't throw light where I wanted it. I eventually got the car running and turned it at right angles so it was under one of the workshop lamps.
I had checked the tappets, some of which were tight. I set them at 0.019" cold so will need to recheck them tomorrow when I warm the engine up. There was a very loud whistle from the rear carb and it was so loud I could tell where it was coming from. I tried tightening the carb to manifold bolts but still whistling. I took the carb off and tested the flange with the edge of a steel rule. I could get a 0.015" feeler gauge in the bowed flange. So filed it flat, refitted it, started it up and set the tickover and mixtures. Runs very nicely. My friend had visited at about 1600 and by 1700 I was done in, back aching and very tired. So I packed up leaving the tappets to set (hot) and the air filters to refit.
I telephoned the supplier of the engine parts in the morning and they looked up the track of the parcel. UPS had tried to deliver yesterday, whilst we were out. Amazingly, I think the last five deliveries have been on a Wednesday, whilst we have our day out! It turned up at 1230 today.
Sorry, no pictures today, just forgot to take any.
23-Oct-15
Started at 0900 and warmed my friends TC so I could check the tappets. When hot I set them all at 0.019". Then refitted the air cleaner. When I went to fit the front air cleaner, he has pancake K & N filters, the filter would have pressed hard on the radiator steady bar. So I left it so I could talk to him about this.
Then started on my cylinder head. I compressed the spring and, after a struggle, got the "O" ring over the valve stem. Then spent the next 20 minutes trying to fit the collets. I just couldn't see them and it was difficult to hold the LED torch in place to shine into the gap and fiddle the collets into place. So, I ask my darling wife to help. She is fantastic. When I explained what we were doing (or at least, in my case, attempting to do) she put the light down and said "back in a minute". She returned with a pair of tweezers. Between us we put all 8 in without too much trouble. We then had lunch and after lunch I pressed one bush out of a tappet and pressed in a new one. I then needed to ream it to fit on the shaft. Problem was my smallest reamer was 4mm too big. So I took the whole lot to an engine rebuild company about 20 minutes away and left it with them to change the other 7 and ream them to size. When I got back I removed one piston from a con rod. I've bought the new pistons and rings inside so I can fit the rings over the weekend.
Just after lunch my friend rang to say he'd found the paperwork and his tappets should be set to 0.015" as he has a fast road cam and 15 thou is the gap for that cam. Never mind, I'll do them again. Whilst talking he mentioned the bolts for the cross member rail I'm getting. I had already rang NTG with an order for head, big end bolts set and a set of small end pinch bolts plus the crank bearings they left out of the last order. So I rang back and they've put two new bolts and lock tabs for the front shackle pins in the box.
All-in-all not a very productive day. I think I'll sort some other stuff out whilst I wait for the rest of the engine stuff to arrive and the rebushed tappets to be done.
.jpeg)
The cylinder head with the valves and new valve springs.
.jpeg)
A tappet with the bush almost out.
ENGINE REBUILD CONTINUES HERE
24-Oct-15
Started at 1000 and removed the TC (friends, not mine) RH radiator steady bar. This car has K&N pancake filters and the front one is pressing hard against the steady bar. I removed the end and ran a tap down the thread which has the adjusting nut welded on. Then, with the help of a bit of heat I reshaped it so it cleared the air filter. I then made a threaded extension tube so it would reach and can be adjusted and then painted it. I then took the dashpots off and lowered the needles 0.025". I got the mixtures right but the jets are fully up. I can now set the mixture with the jet 5-7 flats down. I may have to remove the front carb as, I think, the throttle butterfly isn't central. I cannot get the tickover slower than it is and it feels like the butterfly won't fully close. I then started the engine, got it hot and adjusted the tappets to 0.015" as my friend says it should be. After lunch I fitted the new Thackery washer to the front brake. Then removed the steering column pinch bolt, refitted it correctly (it was in the wrong side and the wheel was moving up and down) and put a new nut and spring washer on, tightened it and the wheel is no longer sliding up and down. I also tried to tighten the screws that hold the door hinges. I packed the holes with a few matches and refitted the screws which helped a bit, but the doors still move up and down quite a bit. Whilst the new gasket was "bonding" to the rocker cover with red Hermatite I took the door panel off a Renault Clio belonging to another friend. He hadn't asked me to look at the car but the door lock on the drivers side will not open the door. I found the problem, the actuating rod clip has broken and the rod has come out of the lock. I put it all back, it will need a new clip. Then refitted the rocker cover on the TC and came in to watch the Rugby.
.jpeg)
Reshaped bar, now not touching the air cleaner.
.jpeg)
The rocker cover having its gasket bonded with red Hermatite.
.jpeg)
Whilst I had the paint out for the steady bar I gave the prop-shaft and fan blades another coat.
25-Oct-15
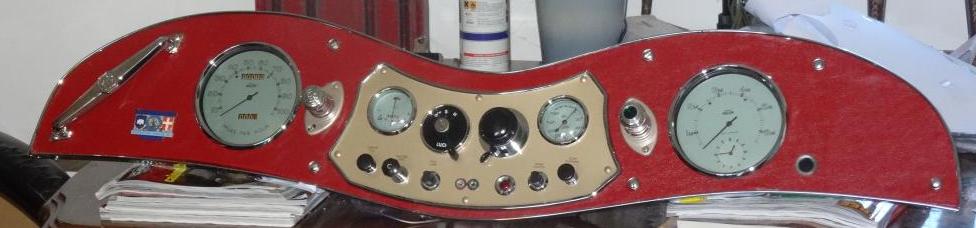
Day off today. I went to write up this months article for the Totally T Types and realised I didn't have a picture of the fully completed dash. So here it is, with University Motors badge.
Two lessons from an athritic, poor eyesighted grumpy old man. Number 1, if you drop a small shakeproof washer that goes on a K&N pancake filter, look all over the chassis and floor for 5 minutes, find it and put it with the others then, an hour later, when you go to refit it and it isn't there don't spend another 10 minutes looking for it, just check the little LED torch with the magnet on it. Number 2, when you're cleaning a con rod with a wire brush don't try and clean the shadows, they will not come off.
Started by fitting the rest of the piston rings . I started yesterday when watching the rugby and, whilst fitting the top oil control ring sneezed and broke it. So I removed an old one, cleaned it in spirit degreaser and blew it out with the airline and fitted it and all the top compression rings. I then removed all the pistons from the old rods and cleaned the rods on the wire wheel and a smaller wire brush in an electric drill.
After that I took the front carb off my friends TC and looked at the butterfly to see if it wasn't central therefore not allowing the throttle to fully close. It looked OK so i checked the flange and found it warped. I filed it flat, refitted the carb and set the idle and mixtures. It's much better but the front carb will not slow down to a 500 rpm tickover so I'll take it off again and centralise the butterfly and make a thicker gasket in case there's still an airleak. I'm sure it's the butterfly as if I push down on the throttle it slows down but once opened it will not return to a slow idle.
The block went back on the bench and I started to free off the camshaft. It was siezed, sp I had soaked the bearing in a mixture of plus gas and oil for a week or so. I now pumped oil through the galleries and over the bearings and slowly worked it round until it freed off. It's much better now and I've left it soaking in oil overnight.
Next up was the removal of the three manifold downpipe studs. I heated the manifold around the stud and, whilst Lynne kept the area hot I tried to remove the studs with a stud extractor. All three broke off! So next job will be to drill the broken bits out and retap the manifold. All good fun.
.jpeg)
The gudgeon pins were partially siezed in the pistons, they needed a bit of persuasion.
.jpeg)
The new piston with the rings fitted.
.jpeg)
Whilst watching the rugby yesterday I fitted the new plug leads and plug caps. Not a good picture but I'm sure you've all seen plug leads before.
.jpeg)
Before and after. A cleaned con rod, including shadow.
.jpeg)
All 4 cleaned and shiny with the caps.
.jpeg)
The carburettor flange showing how warped it was.....
.jpeg)
.... a bit better.....
.jpeg)
.... nearly there....
.jpeg)
.... that'll do.
.jpeg)
Heating the newly painted manifold in an attempt to remove the studs. They all broke off so drilling and tapping to follow.
.jpeg)
Camshaft bearing being oiled.
.jpeg)
The front bearing. You can see the rust marks which I'll get cleaned over the next day or so.
ENGINE REBUILD CONTINUES HERE
27-Oct-15
Went to the doctor this morning and got back at 1030. On the way back I went into the Super U to get some 3 in 1 oil for the dashpots. I walked in with a can of this oil and Lynne burst out laughing, saying she thought the doctor had prescribed oil for my aches and pains. She then tried to oil me through my ears. Nice being married to a nutcase! Then spent 2 hours trying to sort out why Google Chrome keeps crashing. Gave up. Had lunch and went to the bodyshop to do nine jobs on the chassis. I still couldn't find the two nuts for the track rod ends or the two nuts and washers for the front lower shock absorber links. Had the usual nightmare getting the new clip on the rear brake shoe but did it in the end by which time I just couldn't do the other jobs so had a coffee and came home. I planned to start drilling out the broken studs in the exhaust manifold but spent an hour setting up Firefox as a replacement for Chrome. I've no idea what the problem is, I've run two cleaners, done another full scan with AVG, deleted Chrome and downloaded a new copy. It crashes within 2 minutes of starting it and using it. So, my computer, which is supposed to make me super productive has wasted another day in my life.
Whilst at the bodyshop, I took these pictures of a Citroen lorry. I'm guessing it's late 1920's-early 1930's. I told Lynne about it and said I really liked old things. She hit me.
.jpeg)
.jpeg)
.jpeg)
I thought the wheels were supposed to go on the lorry, not in the back...
28-Oct-15
I used to have a memory. Went for my weekly physio (frozen shoulder).Sat in the waiting room for about 20 minutes and then one if the other chaps came out and told me Alex was on holiday this week. Then I remembered that he did tell me no session this week. Came home and we went out for our weekly outing. Went to the bodyshop on the way as I had a suspicion the front plate for the shock absorber arm may be fitted incorrectly. It was right which means I would have looked it up in one of the books. I don't remember looking it up.
Had a very nice lunch and bottle of Pinot Gris. Made up for last weeks manic trip.
29-Oct-15
Early start and removed the front carb on my friends TC. I centralised the throttle butterfly and put a smear of blue Hylomar on the flange gasket and refitted. It now ticks over at 600 RPM (will tickover much lower than that) so that's fixed that. Then closeley inspected the visible areas of the camshaft bearings on my engine and decided to leave well alone. I was having a problem drawing the camshaft out as I suspect the centre bearing is "laquered" in from dry oil (48 years without being run!). So, I spent a couple of hours washing all the oil and Plus Gas from inside the engine, cleaned all the oil galaries with spirit based degreaser, cleaning brushes and a powerful air line (10 bar). I then tapped the new threads in the exhaust manifold and made three studs from long bolts. When finished I hung the manifold on one of the strings hanging from the roof beam and gave it another coat of UHT silver paint. I'll give it another two or three coats over the next few days. Then the engine parts arrived along with the cross member for the other TC. Had lunch and started to fit the cross member. First to remove the two bolts being used as shackle pins. Tight isn't the word, even with a two foot bar I was having to use all my feeble strength to undo them. Having got them undone and out I enlisted Lynne's help and, as usual, she was fantasric and marvelous. She worked the jack as I lined up the spring with the chassis to get the correct shackle pins in. Then the big job. I had to prise the ends of the chassis legs apart 1/8" (3 mm). I eventually got the tube in over the two seats on the chassis, got the pins started in the threads and called it a day.
.jpeg)
Tapping the exhaust manifold.
.jpeg)
Filed the flange so it is a bit more level than it was.
.jpeg)
Running the die down the new stud.
.jpeg)
The new cross member and shackle pins (with lock tabs) for my friend's TC
.jpeg)
The other parts that arrived today. Crank bearings, cam followers, thermostat and other smaller parts.
.jpeg)
The other day I took a picture of the new plug leads. Wasn't a good picture so here it is again.
30-Oct-15
It's now 1015, the TC front cross member and shackle pins are in and greased. The car is off the axle stands and parked straight. I've swept the floor and emptied the bin. Just getting changed into clean working clothes (or, as Lynne calls them "clean dirty" clothes). Then the rebuild starts by fitting the con rods to the pistons and insering them into the block.
Started by fitting the con rod to the new pistons. I had to grind the edge of a 13mm socket to a thin wall to fit over the pinch bolts (which are supplied as metric). Torqued each one-at-a-time and fitted the piston, in the correct bore and the right way round. Then cleaned the crank, again, and fitted the main bearings, the correct way round and laid the crank in and fitted the caps. Crank would not move! removed crank and rubbed the thrust sides of the centre main bearing shells down a few thou. Refitted crank and refitted caps, just pulling the nuts lightly. This time the crank moved smoothly round. Lunch and then I went to the machine shop to get the tappets with their new, reamed bushes.
On my return I asked Lynne if she could come over and read the instructions for fitting the rear seal kit. We had all sorts of problems. Firstly I had to make a gasket as the seal holder was too far away from the crankshaft flange. Ended up making two, one from the cover of the instruction book for the welding plant and the other from the cover of one of the books (on TD's, I bought it as it has a good description of fitting the interior trim). Then I had to grind a bit (a lot!) of the rear face of the rear main cap. I then applied the black sealant and refitted the crank, this must be the 8th time it's been out and back in. I have left it overnight to set.
.jpeg)
Not sure what these numbers, stamped in the sump face of the block mean. Could be a manufacture date, 35th week of 1949.
.jpeg)
The camshaft and bores, all cleaned and shiny.
.jpeg)
Close up of the front two.....
.jpeg)
... and the rear two.
.jpeg)
The 13mm socket ground down to fit the gudgeon pin pinch bolt.
.jpeg)
Ther first piston, covered in graphite and ready to be put in.
.jpeg)
Clamped....
.jpeg)
and in.
.jpeg)
The rear main cap ground down to fit behind the rear main seal holder (Moss conversion kit)
.jpeg)
The seal holder in position. What with making gaskets and grinding caps the crank went in and out like a fiddlers elbow.
.jpeg)
Now fitted with the alignment tool.
.jpeg)
A better picture.
.jpeg)
This is how I left it tonight. The rear seal holder has to come out again. It's got black goo on it which should bond it to the cap. I have to drill a hole in the cap as a drain but the picture in the instructions is so dark that I can't see where.
.jpeg)
I knew all the books I'd bought would come in handy. This one donated a corner of the cover as a gasket for the seal holder.
31-Oct-15
A virtual friend has pointed out that "I spread the legs 1/8" and inserted my member". Oh well, not sure what that says so we'll leave it at that.
I finished fitting the rear crankshaft seal then torqued the main caps. Big ends went in next and then the front cover plate, then the timing chain and gears and finally the timing cover. Just preparing to fit the sump. My friend came to get his car. He cycled 53 miles from his home..... like my son a keen cyclist.
.jpeg)
The completed rear crankshaft oil seal.
.jpeg)
Big end caps bolted on, torqued down and split pinned.
.jpeg)
One and four done, now to turn the crank and do the other two.
.jpeg)
All done.
.jpeg)
Looking good.
.jpeg)
Front plate and cover on the timing gears.
End of another month. Lets hope I can finish the engine by tomorrow night.
ENGINE REBUIULD CONTINUES ON NOVEMBER
OK, another month gone, you can now move on to November.
March April May June July August September October November December January February March April May June Tech. Index Gallery