
HOME WELCOME SEVEN ELAN ELISE MIDGET FAMILY GUEST BOOK
Carbon upgrade Engine upgrade Other upgrades Rear brakes 2004-2006 upgrades Accident rebuild pages Refurb 2014-15
Introduction February 2007 March 2007 April 2007 May 2007

Thursday 1st March: Spent the morning at the social services trying to
sort out my Carte Vitel (French medical insurance). Referred back to DHSS in
Newcastle. Then to the Sous Prefecture to see how I register our Peugeot
806 which has UK plates but not registered in the UK (sort of stateless car).
The lady in the office is just brilliant! She got all the forms and explained
what to do and what to get. She's made it so easy. Then onto Brico Marche for
some bits, mainly metal polish for the wheels. Spend 60€ and come away without
metal polish! In the meantime Lynne decides to do her weekly shop at the Super U
next door instead of the one in Pouance. So I wait patiently.
Get back for lunch and then shoot of to Logie Marche in Reneze to get metal
polish. Back at 3pm and start polishing the rims.
 After 2 hours of polishing they may look good but, on close up inspection,
they're crap!
After 2 hours of polishing they may look good but, on close up inspection,
they're crap!
5pm, so what can I do for an hour. Strip the bench grinder and rebuild to
stop the vibration. That was good, it's now worse than before.
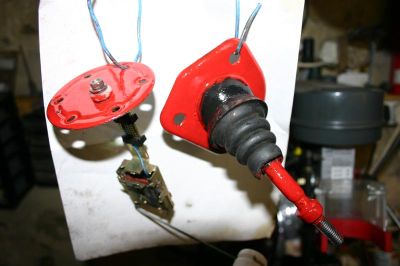
I do not seem to be able to restrain myself. One of the things I bought today
was a kids set of artist brushes, so I spend 1/4 hour redoing the gold lettering
on the rack. Then walk past the gearbox and remember the gear lever needs
de-rusting. I got some French de-rust fluid today, so out with the lever and
apply the new stuff. It's very much like Kurust but thicker. It works well and
in 10 minutes the lever assembly is ready for painting. The final result is
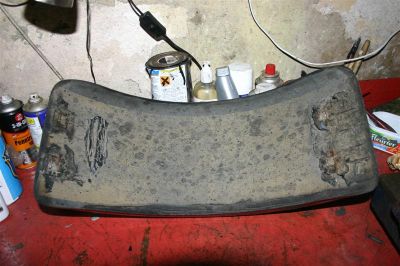
below, along with the fuel tank sender unit. Someone help me!
 sad!
sad!
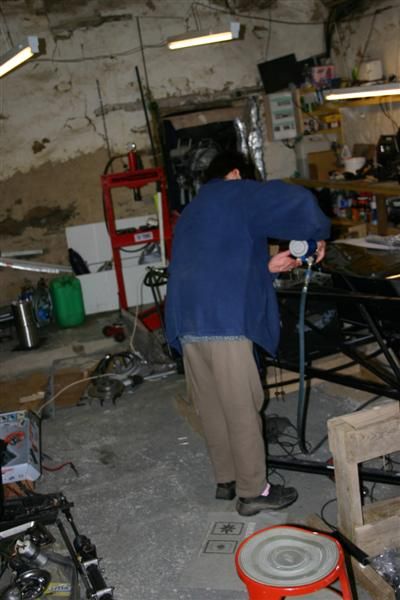
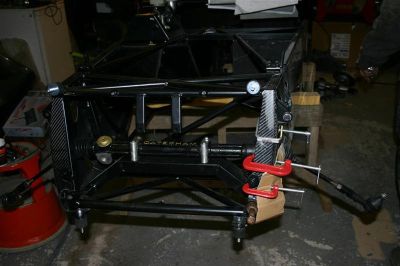
Friday March 2nd: Having decided to fit a new dash, rather than wait
for the new one to arrive I decide to remove everything from the present dash
and make up a template to cut the holes in the new one.
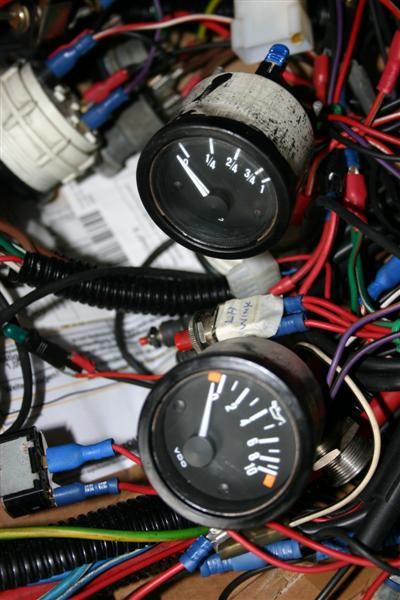
 This is a section of the dash when the switches and gauges are in place. The
switches to the left are the lighting and the small black gauge is the temperature
gauge, the large white one with the red ring is the tacho.
This is a section of the dash when the switches and gauges are in place. The
switches to the left are the lighting and the small black gauge is the temperature
gauge, the large white one with the red ring is the tacho.
So I take each gauge off one at a time and refit the wires. Likewise with each
switch until I have an "empty" dash and a mass of wires with bits on
the end....
 ... which looks like this.
In the afternoon I have a couple of hours break and then start making the
template for cutting the holes for the gauges, SPA speedo and FIA battery
switch. I'll leave the positioning of the switches until I have the dash in the
frame and can sit in the car to get the positions correct. I've made a carbon
under dash panel which will go by the steering column for the switches which are
not used when driving. These are the 2 switches for setting the shift lights
which are in the tacho, the speedo on/off and function selection switch and the
fuel pump switch. I can do away with the huge hazard warning switch as the self
cancelling unit does that. I will be left with: Lights, dip, h/l flash switches,
the two indicator touch switches, the horn push and the fan override switch.
Then there the DIN plug for the battery conditioner (which can go on the far
left), the warning lights (left and right indicators, ignition, main beam and
low oil pressure). Finally the ignition key (which may go under the dash) and
the Big Red Starter button.
Should be fun designing that lot.
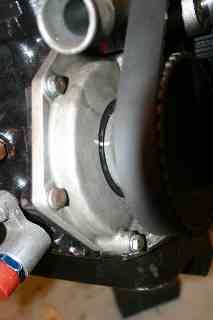
Saturday 3rd March: First thing was to remove the fuel and oil
pressure gauges (the only 2 original VDO gauges left) and scurf the bezels down
to bare metal and paint them.
 Painted bezels. They don't look as bad as they do in this photograph
Then the postman arrived with the pipe union from Think Automotive. Excellent
service and very helpful people. So now I've got to get the little nipple back
on the plastic pipe having put the new tube nut on the pipe. Not as easy as it
sounds. After trying for about an hour I surrender. The pipe is now in the
freezer being shrunk. The nipple will be heated over the gas ring to expand it
and, hopefully, it will slip on to the pipe.
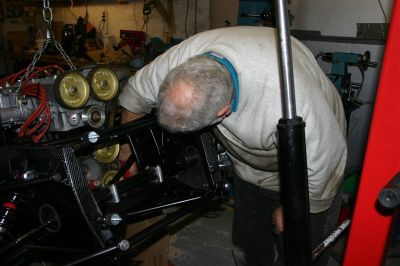
I know call Lynne to help me check the engine timing. I get the engine
hanging on the crane at waist height. I turn the flywheel whilst Lynne watches
for the timing marks to line up. Having gone round 4 time I begin to see that
something is wrong. So off with the cam cover and number 1 plug to find TDC.
OK, found the problem. Last time I changed the cam belt (which is every 6000
miles) I fitted the crankshaft fan belt pulley, which has the TDC mark on it,
out by one hole so the TDC mark was 120 degrees out.
Lynne says she'll not let me forget that I, a superior male, did something
wrong! With the pulley on correctly, the marks line up perfectly.
This is the timing marks on a BDR.
 jack shaft has 2 white marks.
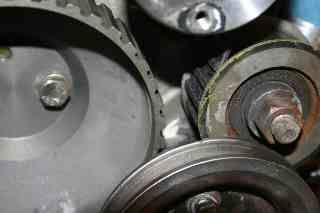 Crank mark line up with edge of jockey pulley.
 The camshaft marks are on the inner edges in a straight line with the centre
line.
The camshaft marks are on the inner edges in a straight line with the centre
line.
These photos were taken earlier, the pulleys are now gold and rust free!
Pack up at 4:30pm to watch the football scores. Wednesday are winning 3-0
against Leeds but it ends 3-2, the whistle coming not a moment too soon.
Sunday 4th March: Polishing time. Give the cam housing a light polish
with a flapper wheel and wire brush. Then remove the cam cover and scrape the
paint off it in readiness to blasting it with glass bead.
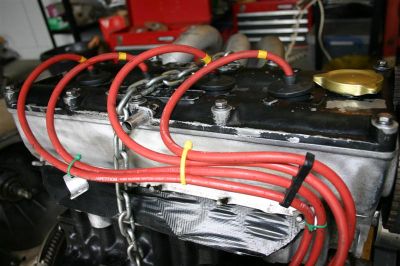 Polished cam housing.
 Half done.
 Fully done and back on the engine.
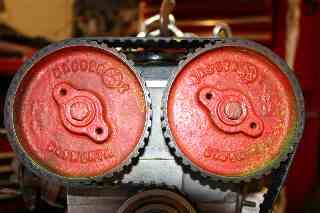
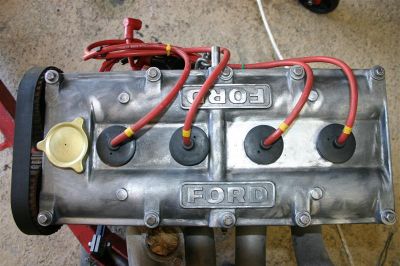
 Shiny engine. When blasted with glass beads it should look like chrome.
I may pick out the "F O R D" in red paint.
Shiny engine. When blasted with glass beads it should look like chrome.
I may pick out the "F O R D" in red paint.
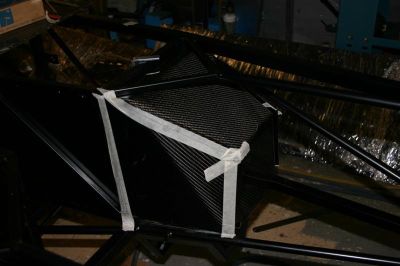
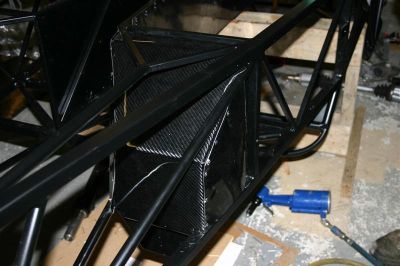
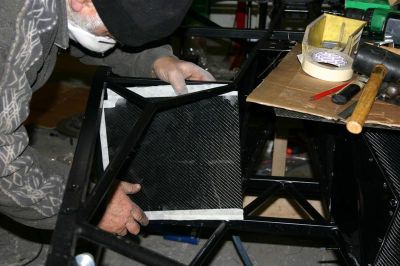
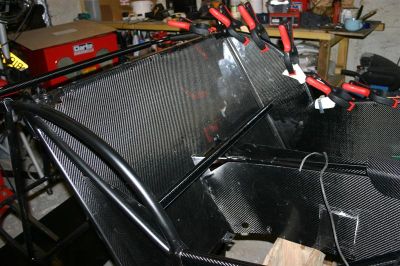
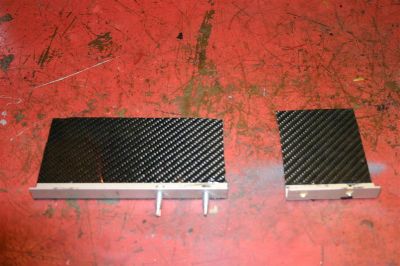 Finish the day by making two little carbon panels bonded to aluminium
brackets which will fit either side of the steering column. All the non
essential switches will go into these panels.
Finish the day by making two little carbon panels bonded to aluminium
brackets which will fit either side of the steering column. All the non
essential switches will go into these panels.
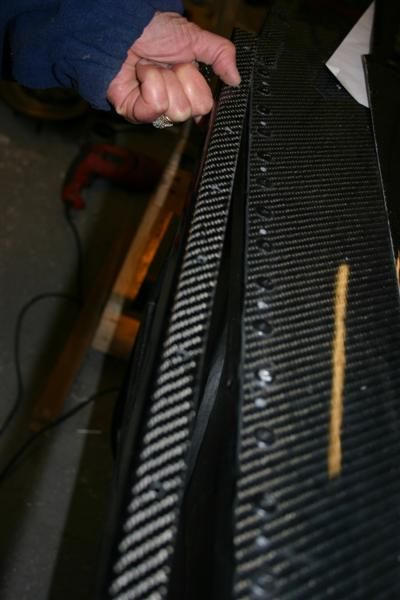
Following a request for info on Bighead fasteners which hold the front wings
on....
 The bighead fastener, They are known as 316-B32 Cable Tyrap Stainless Steel
Bighead fasteners and are not in the catalogue as you must specify they are for
a Caterham wing.
The bighead fastener, They are known as 316-B32 Cable Tyrap Stainless Steel
Bighead fasteners and are not in the catalogue as you must specify they are for
a Caterham wing.
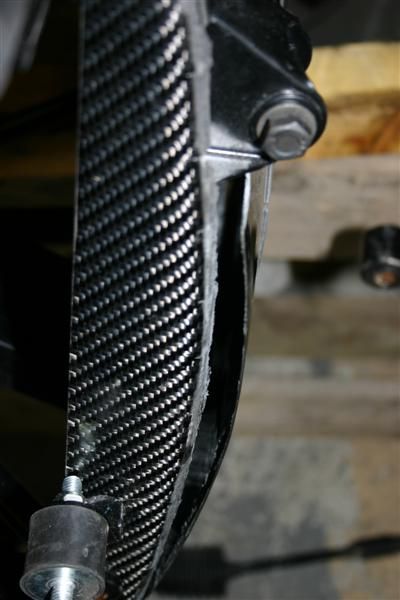
 And this is the fastener bonded to a wing. Look a bit of a mess because it's
not been washed.
And this is the fastener bonded to a wing. Look a bit of a mess because it's
not been washed.
Monday 5th March: No real work done today. Spent the whole day ringing
suppliers to chase them to get the stuff delivered.
Tuesday 6th March. Can I let you into a secret? The paint I bought,
Hammerite anti rust for iron gates and railings..... comes off when wiped with
petrol!
B U G G E R
So, I spend the morning on the phone chasing suppliers again then collect
Lynne from her school (she is at school learning French) and we go off to
Nantes.
We have lunch in the Italian in the shopping centre at Atlantis then whiz
round (I mean whiz, poor girl was having to run to keep up) to get new picture
frames for the water colours that we have in the gites. These are painted by a
LC7 member and are for sale. We then go into Brico Depot which is like a B&Q
super store. Spend best part of an hour looking for metal paint that is suitable
but they don't stock it!
Make our way home and stop off at a Brico Marche (normal size B&Q) and
ask the assistant if their paint is "resistante d'essence". She
confirms it is so 11€ and I'm happy. Get home and paint one of the radius
arms.
Wednesday 7th March: The "resistante d'essence" paint wipes
off with a petrol soaked rag. I'm not giving up. I go into town and visit a DIY
store (Toute Faire) and a garden centre (Gamme Vert) and neither stock petrol
resistant paint. So off to a farm provision centre about 10 miles away. No, they
stock the same stuff. OK! I'll go to the tractor dealer in Croan, which is about
25 kms away. Take the back road but when I get to the first village a sign says
"Route Barre" and the road is completely blocked by workmen digging up
the road and drains. No warning at the 5 kms road I've just driven up! So
turn around and go back to the main road and take a different route.
The tractor place does have a paint which looks like it may do. The assistant
tells me the farmers use it on their equipment. I assume he means farm
implements! I get back just in time for lunch and then paint two radius arms,
the de-dion tube and "A" bracket. The colour, "Grise", Grey,
is much lighter than the first stuff, far more like silver. I leave it all
hanging on a wire I've set up. Now back to the phone and sort out a supplier for
the wings and nose cone.
Because the original supplier of my wings and nose cone is having production
problems I have to source a complete set from elsewhere. I finally decide on MOG
Racing in Germany. Their stuff is a bit heavier than I have but is also a bit
stronger as they have a layer of glass fibre sandwiched between two layers of
carbon. can't have it all. Now to see if the insurance company will pay the
extra money.
Before I know it it's 7pm and dinner is ready.
Thursday 8th March: Success! The new paint does not melt in petrol. I
now darken it down a bit by pouring some black paint in it. I have so far
painted all the rear suspension & drive shaft bits. I'm back on the phone as
I type this and will return to paint the front suspension bits after lunch.
We've also had an offer on the house near Sheffield, 16 months after it went
on the market and £108,000 less than the valuations (by 3 agents and the
building society surveyor) in November 2005. I've got to decide whether to
accept it. Probably will.
After lunch I pick out the W I L W O O D letters in silver on the front calipers....
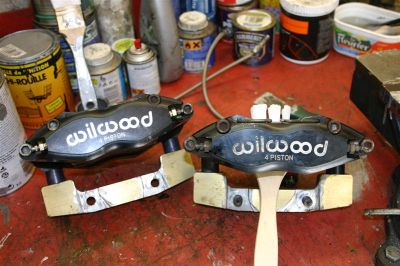 Before and after.
... and some modern sculpture. Wonder if I can get it hung in Tate Modern?
 2 drive shafts and both front uprights drying. The new colour isn't as dark
as the first but at least it stays on!
2 drive shafts and both front uprights drying. The new colour isn't as dark
as the first but at least it stays on!
I then started to alter the feed pipe to the oil filter (from the oil pump).
The thinking was that if it's routed downwards instead of over the pick up pipe
the steering column will go lower and reduce the angle of the UJ. Having spent a
couple of hours and standing there admiring my work, I realise why I didn't do
this in the first place - the engine mounting bracket will not fit! Back to the
drawing board. However, by now I can hear the bar calling me, so it's a quick
wash and change and down to the bar. The new owner is beginning to make her
mark. new fridge unit, glass washer and ice maker. She's already got a new beer
tap and changed to 1664. I can't see where she's going to get the extra custom
to pay for all this but she very nice and speaks a bit of English. Her 13 year
old daughter is delighted we go in as she will teach us French if we help her
with English. Sounds good to me, the bar is a much better place to learn than
the school.
Friday 9th March: Finish off the oil feed pipe to the filter. I get it
a bit lower than it was but it still goes over the pick up oil pipe. Never mind,
Then I get the two undamaged wishbones and the wing bracket and scurf of the
rust and treat with the French version of Kurust. I can't paint them for 24
hours so they're left hanging on the line to dry.
Come in and accept the offer on the house. Even though I've lost a huge sum
of money I'm glad it's sold. (I know it's not a real loss but it is valued at £108,000
more).
Lunch, then back to the war zone known as the workshop. I'm going to look
again at this oil pipe, I'm sure I can get it going under and still get the
engine mounting on. I never give up do I?
I'll come back to the oil pipe, I'm not sure there's a real problem to fix
anyway. I decide to see if I can align the alternator, the pulley is slightly
forward of the the other two. I notice that the mounting bracket is
rusty so take it off and scurf it down to bare metal. a coat of primer and 3
hours later a top coat of pillar box red. Guess where it is now. You got it,
hanging on the line.
 Sad but I think it's nice. SOMEONE SAVE ME!!!
 At least the alternator will hide it.
Then look at the support strap on the huge hole I cut in the alloy bell
housing which had provision for left and right starter. Problem was the right
hand "hump" got in the way of the pedal box. Angle grinders come in
handy for these problems. However I fitted a support strap between top and
bottom starter bolts. The shaped ali cover fitted to these bolts but now I've
made a carbon cover I'm concerned it will fracture when I tighten the
bolts. So I make 2 studs which I fit into the casing, then tighten the strap
over these (17mm size nuts). Then I have enough thread showing to gently tighten
the carbon cover to the housing. They say a picture speaks a thousand words -
now you know what they mean.....
 ... easier to just have shown the picture.
I then noticed a bit of surface rust on the edge of the clutch plates. So off
with the clutch (The bulk buy impact wrench comes into it's own for this). Then
spend an hour polishing the 2 driven plates and the cover and reassembling.
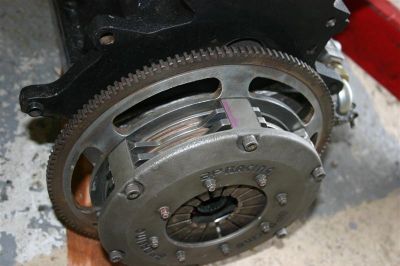 A polished twin plate competition clutch. Pity it'll be dirty within the
first 100 miles!
A polished twin plate competition clutch. Pity it'll be dirty within the
first 100 miles!
Someone on the Westfield Forum wants a picture of a type 9 gearbox. Someone
else was wondering how to blank the Speedo drive off. Two dead birds?
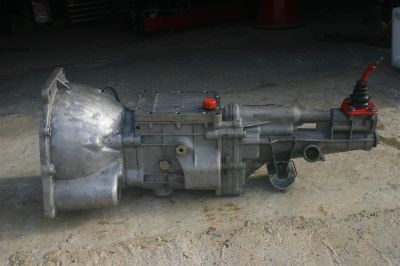 Left hand side of the box. This box has a Quaife ali casing and a bright red
gear lever. The filler plug is the lower of the two large "gold"
coloured nuts. (the other is the selector locator) The Speedo Drive would go in
the large hole in the extension, the one just below the "gap"
Left hand side of the box. This box has a Quaife ali casing and a bright red
gear lever. The filler plug is the lower of the two large "gold"
coloured nuts. (the other is the selector locator) The Speedo Drive would go in
the large hole in the extension, the one just below the "gap"
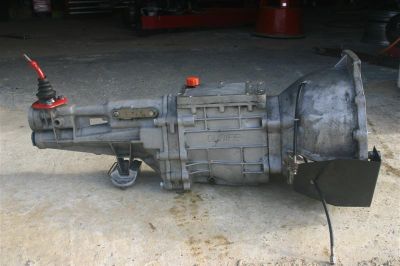 Right hand side of the box. The oblong plate on the extension housing hold
the spring and plunger for the gear selectors. The sandwich plate between the
casing and the tail extension is to house the 5th gear. The gearbox started out
as a four speed and this was Fords method of building a 5 speeder without a
complete redesign.
Right hand side of the box. The oblong plate on the extension housing hold
the spring and plunger for the gear selectors. The sandwich plate between the
casing and the tail extension is to house the 5th gear. The gearbox started out
as a four speed and this was Fords method of building a 5 speeder without a
complete redesign.
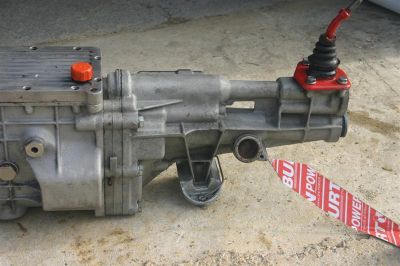 Close up of a core plugged Speedo drive aperture. Note the fickle finger of
fate pointing at it. Tried to get a sexy model to do it but she was still in her
pyjamas!
Close up of a core plugged Speedo drive aperture. Note the fickle finger of
fate pointing at it. Tried to get a sexy model to do it but she was still in her
pyjamas!
Sunday 11th March: Refit the painted gearbox mounting and take the
pictures above. (Should they be on Saturday or Todays diary - well it doesn't
matter, I'm not changing it now).
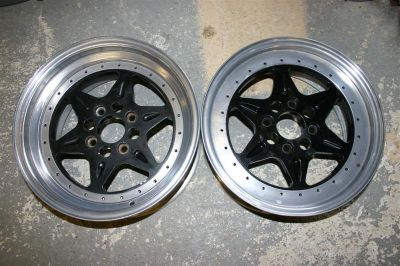
I'm now going to sit in the sunshine and polish the wheel rims.
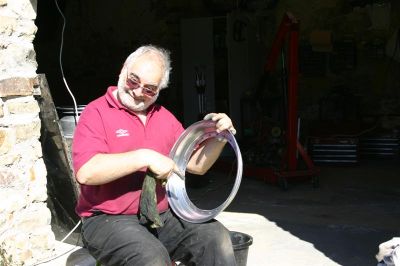 A little gnome polishing a wheel in the sunshine.
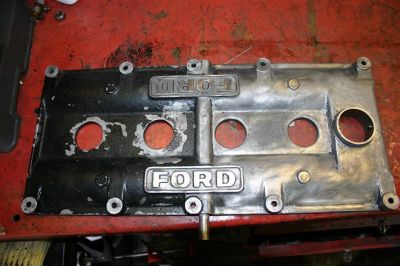
 Decisions, decisions. This cam cover is going to be glass bead blasted. It
should look like chrome after this treatment. So what colour should I
pick.....
Decisions, decisions. This cam cover is going to be glass bead blasted. It
should look like chrome after this treatment. So what colour should I
pick.....
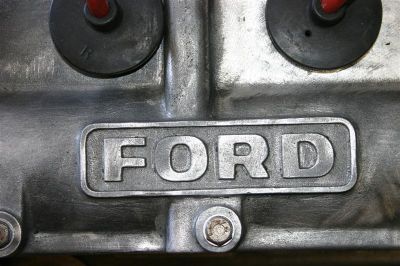 ... out the letters F O R D? The cam cover was originally
gold which looked a bit "cheap". So I scraped that off but then
painted it black. I think it's between gold and red. Answers on a post card
please.
... out the letters F O R D? The cam cover was originally
gold which looked a bit "cheap". So I scraped that off but then
painted it black. I think it's between gold and red. Answers on a post card
please.
It's 1:30 here, 12:30 in the UK, so I'm washed and changed to watch my
childhood team, Spurs play Chelsea in the cup. It'll probably be a disappointing
afternoon.
Not disappointed at all, what a great game.
Monday 12th March: Today the gnome will be cutting grass.
So a temporary halt to painting silly things silly colours.
Now back to grass cutting - when it warms up a bit.
Monday 12th March: Grass cutting and charging battery on the tractor.
So knackered after that I went to bed at 9:30pm.
Tuesday 13th March: Had the morning off and then more grass cutting.
So far all I've done is trim the edges of the drive. It's a very long drive mind
you.
Wednesday 14th March: Up bright and early to go to Segre to see the Medical Assurance
lady. We have a letter from the Pensions people in Newcastle informing the
French that they'll pay for my medical treatment for another year. Nice of them
after 45 years of tax and NI.
Then get conned into shopping and end up back home at 12:30. Drill out the
rivets holding the 4 bonnet clips and then have lunch.
After lunch start the tractor and attempt to cut the grass. Have to give
up as some of the field is still water logged and the grass is too wet to cut
anyway. Spend the rest of the afternoon moving some bits to the other end of the
workshop as I've got a friends car to get in next week.
Thursday 15th March: Spend the day pottering about doing this and
that, bits and pieces. Then decide to move all the bit from one end of the
workshop where they are laid out to the other. This is because I've got a
friends 7 coming on Wednesday and it will need to go inside. He's moved back to
the UK and has the car up for sale. I'm looking after it till it's sold.
Friday 16th March: Spend the morning cleaning 2 gites ready for the 3
lads who are bring my chassis and other bits over today.
Y I P E E ! ! ! T O D A Y' S T H E
D A Y!
Spend the afternoon on tenterhooks waiting. Move this here, wipe this part,
tidy those screws, the waiting's driving me mad!
They are supposed to ring when they get to Le Mans. That way we'll have a
good idea when they'll arrive and can book the restaurant if early enough or
bring in Pizzas if later. 6 pm and no call so I ring. No answer! Call cannot be
connected. I go into one and bite Lynne's head off. Then try again. Same thing.
I'm now not sure if they have a problem or just not heard the phone. 5 minutes
later Kris rings "have you been ringing me?"
They are on the A28 but not sure how far down. Then a sign come up saying
"ALENCON 76 Kms". OK about 50 miles North of Alencon. At the rate it's
taken them to get that far I reckon they'll be here at 8:45pm. They were held up
because they got lost in Rouen. We've all done that!
"What speed are you doing", "About 70 mph" I suggest they
can speed it up a bit and they agree that everything is passing them.
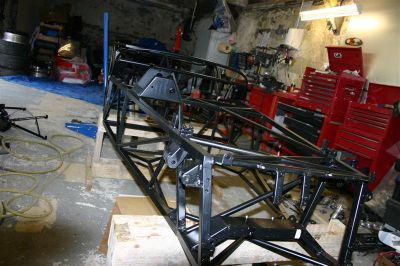
 They arrive at 8:00pm. The repaired chassis on the top of Kris's Renault
Megane. Kris is on the left, one of his two mates, who came with, is on the
right. All the other stuff, shown below, was in the car along with these 3
strapping lads!
They arrive at 8:00pm. The repaired chassis on the top of Kris's Renault
Megane. Kris is on the left, one of his two mates, who came with, is on the
right. All the other stuff, shown below, was in the car along with these 3
strapping lads!
I suggest we get the car inside the workshop to get the chassis off the top
of the car. Kris drives it in and touches a seat support which is laying by the
side which swings it round and the other end, the one with the rusted bolt in it
goes under the tyre. POP, HISS.
I get a jack under the front and we then get the chassis off. Then we have to
empty the car in order to get the spare out. Car emptied, wheel changed and
we're off to the Resto.
Saturday 17th March: First thing is to get all the parts into one
place and photograph them. Then to get my birthday present up and running and
blast my bits. It's 8:30 here, I'm washed and dressed and the lads have just
phoned to say they left at 4:30 and are past Rouen and should be in Calais in 2 hours. The
boat sails at 12:45. They may just get an earlier one.
Right, enough of this captains log and star date nonsense, I'm
going to grab some breakfast and go play.
 The lads got all this in a Megane! It doesn't show very well but the stuff
wrapped in bubble wrap at the centre rear is the carbon bits. These were over
their heads and tucked under the sun visors. The fuel tank was here all the
time.
The lads got all this in a Megane! It doesn't show very well but the stuff
wrapped in bubble wrap at the centre rear is the carbon bits. These were over
their heads and tucked under the sun visors. The fuel tank was here all the
time.
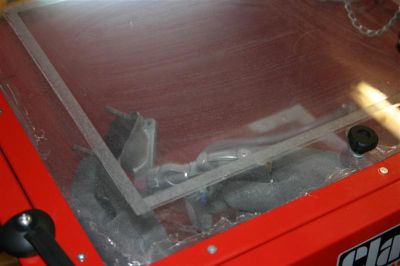
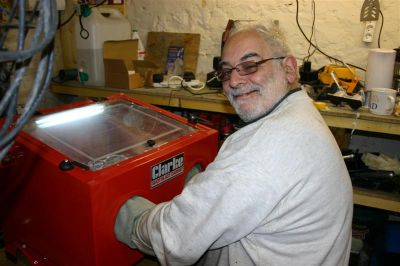
First job was to set up the new shot blasting cabinet. (It's the large red
thing on the left). I have a 5 kg tub of glass bead. To get practice and not
damage anything critical I start by blasting the thermo housing.
 This is blasting one of the manifolds. You can see a gloved hand pointing the
gun at the manifold held in the other gloved hand.
This is blasting one of the manifolds. You can see a gloved hand pointing the
gun at the manifold held in the other gloved hand.
 Careful! Blasted Gnomes at work
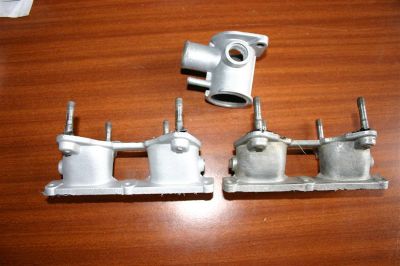 The manifold on the left has been done as has the thermo housing. The grubby
thing on the right is next.
The manifold on the left has been done as has the thermo housing. The grubby
thing on the right is next.
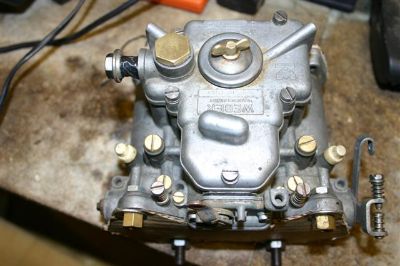 A carburetor before treatment
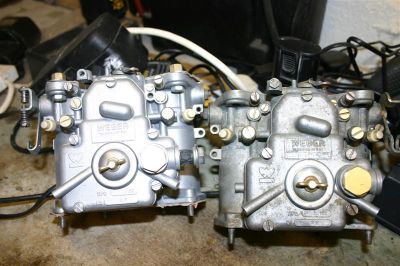 And after treatment. Looks good next to untreated carb.
Having spent all morning and an hour after lunch blasting away I thought I'd
give the compressor a rest. The cabinet uses huge amounts of air and the
compressor is going all the time. I stopped every 5 minutes to give it a rest.
I then overhauled the carbs & gave them a good clean and blow out. Then
cleaned the fuel filter and changed the filter element.
Refitted the manifolds and the carbs. Fitted new fuel hoses.
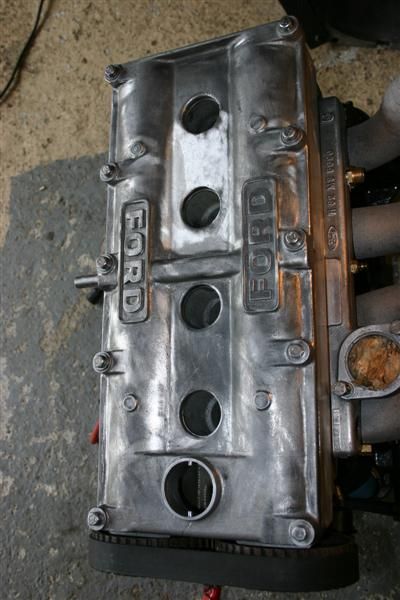
removed the cam cover and spent an hour blasting it. The glass beads are
losing their "sharpness" so it now takes longer to get a good, even
finish. When done I give the cover a good blowout and wash in petrol followed by
another good blow. All these blow jobs are making me tired.
 The gnome applying Hylomar to the cam cover.
 As you can see Lynne has joined me and is snapping everything in sight.
"what colour should I pick out the FORD letters dear, Gold or Red"
"Blue". Oh well it is Fords colour so I find some Blue paint and here's
the result. (I'll give it another coat in the morning.
As you can see Lynne has joined me and is snapping everything in sight.
"what colour should I pick out the FORD letters dear, Gold or Red"
"Blue". Oh well it is Fords colour so I find some Blue paint and here's
the result. (I'll give it another coat in the morning.
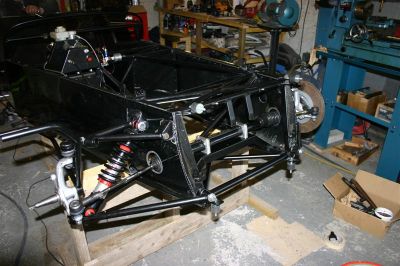
Lynne as finally looked at the chassis.
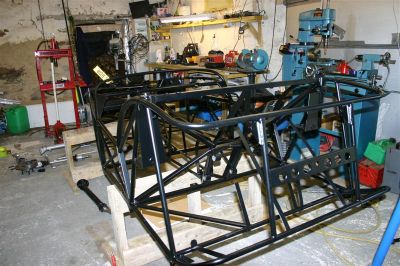 The rear end.
 From the front.
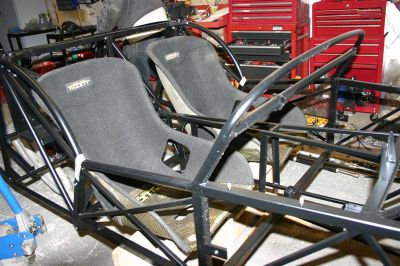 Who's impatient?
A very tiring day but my Birthday present has really done it's job. I have
some suspension bits to do. I have written out tasks for each day and tomorrows
was to make the new dash. However I've made a executive decision and will leave
that job until I can sit in the car and make sure everything is in the right
place. So tomorrows jobs are .......... who knows, I'll decide in the morning.
Sunday 18th March: I should be starting on the panels but Lynne's not well,
she got a flu like bug, and I need a hand to turn the chassis around and upside
down.
So, find some other bits and pieces to do. First I move all the new bits from
the "studio" (see photo above) to where they should be, laid out
around the car. I put the new suspension bolts in place and turn down the two
top rear wishbone bolts to make them easier to fit. Then find that the repaired
chassis has the later rear shock absorber mounts, (which I wanted) But search my
stock of fixings I cannot find 2 12mm x 60mm bolts with 1.75 pitch thread.
Also find the new oil tank has larger pipe union threads than the unions fitted
to the old tank. Emails will go off toute suite (see I am learning French!)
Then rebuild the steering rack. That doesn't take too long but filling
it with gear oil does. It's now lunch time. Lynne is feeling better. She
volunteers to help me move the chassis.
I had got the engine on the crane before lunch so continue to fit new cap
headed zinc plated 1/4" UNC sump bolts in place of the short 7/16" hex
headed mild steel (rusty) screws originally used.
Then I rebuild the two undamaged wheels. This entails fitting 24 screws too
each wheel to hold the three pieces together and then sealing the joint with a
special mastic gluey stuff. Not difficult just time consuming and boring. Also
gives me a backache as well as being a pain in the arse!
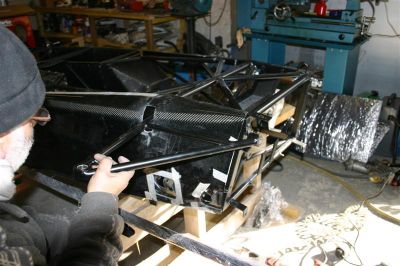
Having got the chassis facing the right way and upside down I spend
the rest of the day sorting out which panel is which and where all the little
bits go. I come in about 6pm and do another page on the manual I'm writing to
assist others in fitting carbon panels.
Answer a few emails, send off a few emails (need the bits ASAP) and then have
dinner, write this up and fall asl................
Monday 19th March: Spend 3 hours this morning fitting one interior
panel. The panel doesn't line up properly on the new sections fitted in the
repair. So a lot of new holes to be drilled and the old ones filled in with
large headed rivets. I have to stop at 12:30, get showered and changed to go to
the hospital. We don't get back until gone 5 (spent an hour in Brico Marche
getting some bits and pieces). No further work today.
Tuesday 20th March: Today I have my little angel helping. She's a
superstar, just getting over a cold but she dress up warm and joins battle. I'm
drilling the holes and Lynne's riveting. What a compliment! I mean she's working
the rivet gun. We get the opposite side panel which took 3 hours yesterday
in in under an hour.
We then spend the rest of the morning making and fitting the drivers
footwell. Richard has sent the bits but he wasn't sure they were the correct
shapes. They're not! But not that far out. A bit of cutting and, when we turn
the chassis up the right way, a little plate to fill in, and it will look as if
it was made for the job.
The other two panels are also in and the thing that took time today was
welding in a couple of nuts for the lower seat belt anchorage. The MiG wasn't up
to it so I had to braze them in. A quick paint over the area and the other two
interior panels are fitted.
I then have to cut a cardboard template for the new floor panels. I finish
the day on my own as the "boy" has gone for a shower and to cook some
dinner. She may be marvelous but doesn't understand what's important. So
template made, one floor cut to shape and fitted in with 2 rivets. I just get 2
sides marked out for rivets when I'm called for dinner. However I do have time
to prove that the template is good for the other side when turned upside down.
Plan for tomorrow is to fit the floors and get one side skin on before lunch.
Lets see if we can keep to it.
 Brazing on a new seat belt bolt. The new rear end has fixings for reel belts
and I have 4 points.
Brazing on a new seat belt bolt. The new rear end has fixings for reel belts
and I have 4 points.
 Fitting the drivers side footwell.
 All the bits fitted and the masking tape on ready for drilling.
 Done! I hope you've realised that the chassis is upside down.
 The nearside footwell is much easier to fit - there isn't one. It's a flat
panel as the footwell is not fitted. The dry sump tank goes where it used to be.
The nearside footwell is much easier to fit - there isn't one. It's a flat
panel as the footwell is not fitted. The dry sump tank goes where it used to be.
 The new floor panel ready for riveting.
 And the little helper riveting all those little rivety things in. The rivet
gun is the pop-pop, the centre punch is the bangy thing, the tube for tapping
tight rivets in is the knock-knock and the drill is the whirry thing. Women!
And the little helper riveting all those little rivety things in. The rivet
gun is the pop-pop, the centre punch is the bangy thing, the tube for tapping
tight rivets in is the knock-knock and the drill is the whirry thing. Women!
 One carbon floor fitted. It looks a lot better in the flesh. The right hand
rivets still have masking tape under them as I forgot to remove the tape before
Lynne riveted. I'll get it off with a dab of petrol to melt the adhesive.
One carbon floor fitted. It looks a lot better in the flesh. The right hand
rivets still have masking tape under them as I forgot to remove the tape before
Lynne riveted. I'll get it off with a dab of petrol to melt the adhesive.
Wednesday 21st March: All day long spent cutting the holes for the
front suspension on the side skin. So our targets are not met! A failure. Steve,
a friend, is bringing his 7 over for me to baby sit until it's sold. He was
supposed to be here by 7 and we planned to go to the bar and then the
restaurant. However he's held up with moving people and landlords. So we go to
the bar and Resto on our own. The restaurant owner treats me to a quadruple
Cognac. Just as well HM's driving! We get back at 10:30 and Steve arrived at
11:00. We then spend the next 2 hours drinking and talking.
 one floor and the footwells.
 Cutting the front flitch plate to size.
 I decided to rivet the lower angle for the side skin on top of the floor
rivets. This will enable me to remove the side skin without drilling out the
floor rivets. OR.... did I forget to put the angle in with the floor?
I decided to rivet the lower angle for the side skin on top of the floor
rivets. This will enable me to remove the side skin without drilling out the
floor rivets. OR.... did I forget to put the angle in with the floor?
 measuring the low aperture for the wishbone for size. The template for the
cut outs has taken about two days to make. But now it's done the next side will
only take an hour to cut out. I hope!
measuring the low aperture for the wishbone for size. The template for the
cut outs has taken about two days to make. But now it's done the next side will
only take an hour to cut out. I hope!
 The side skin held in place by clamps. I have a hole to drill for the exhaust
bracket and a bit more cutting for the front suspension and then the side panel
can be fitted.
The side skin held in place by clamps. I have a hole to drill for the exhaust
bracket and a bit more cutting for the front suspension and then the side panel
can be fitted.
Thursday 22nd March: No progress today as we took Steve, to the
airport. Tours airport which is 2.5 hours each way. He's left his 7 here whilst
he sells it. Lynne wouldn't let me drive as she reckoned I was still pissed from
last night. As she was right, I didn't argue.
Friday 23rd March: Hospital for 9am. The doctor is late so don't get
my liver photographed (ultrasound) until about 10:00. Whilst he's rubbing the
transmitter across my belly I say to him is a very serious voice. "Le bebe?
est tres bon?" He gives me a very funny look before he realises I'm joking
then bursts out laughing very loudly.
After leaving the hospital we go searching for breakfast as I wasn't allowed
to eat or drink before the ultrasound. We go to the hyper market and get a salad
for breakfast (no wonder they call us the "mad Englishman"). We then
do the weekly shop and, at 12:00 make our way home.
After lunch (I know it was only a couple of hours ago I had breakfast) I
start on the final cuts for the side panel. Then drill and rivet the sections
that the panel sticks to. At about 4pm we mix the gooy stuff (Urethane) and
stick the side panel on the car. You have about 20 minutes to get the glue on,
the panel in position, clamped and wipe any excess off. I leave the panels
clamped up and will take a photo first thing in the morning.
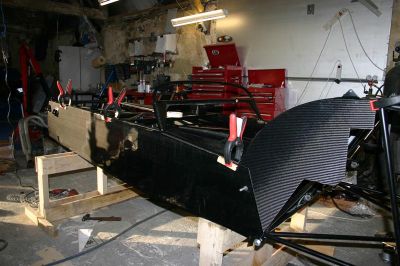
 Side skin fully fitted and clamps removed. I've also fitted the rack
(loosely) but the front flitch panel is still not glued in. This proved to be a
problem.
Side skin fully fitted and clamps removed. I've also fitted the rack
(loosely) but the front flitch panel is still not glued in. This proved to be a
problem.
Saturday 24th March: Lynne has a lie-in so I take all morning fitting
the new interior rear panel. This is a replacement for the one I burnt a hole
in. I know you just have to know how I burnt a hole in the rear panel.
Anyway that took all morning and after lunch I fitted the inner and outer 1/4
panels.
 New inner rear panel and the 1/4 panels clamped for fixing with glue.
I then got Lynne out and we turned the chassis back over so we could fit the
other side of the floor. Luckily the cardboard template I made for the first
side works for the other side when turned over.
 The new floor giving a good reflection of two fluorescent lamps. I wonder how
many times I'll polish the floor. Shall I tell you? Never.
The new floor giving a good reflection of two fluorescent lamps. I wonder how
many times I'll polish the floor. Shall I tell you? Never.
We then had a go at fitting the rear panel. Problem! The panel is a very
tight fit to "stretch" around the rear onto the two upright bars. At
first I think Richard's made the thing too short. Then I realise. It's like me,
the car has a fat arse!
I'll put it away and come back to it tomorrow. We turn the chassis back the
right way so I can start fitting the other side skin in the morning.
Sunday 25th March: Clocks went forward last night so I get an early
start as I wake up at my normal time. Or is it a late start. Oh, who cares.
Lynne was still asleep when I wandered over to the workshop and the morning
service was still on Radio 4.
 This flitch panel, which fitted perfectly before the side skin was riveted at
the lower front now has a fairly large gap.
This flitch panel, which fitted perfectly before the side skin was riveted at
the lower front now has a fairly large gap.
I ponder on what to do about the flitch panel. Why not leave it and come back
to it. I busy myself by trying to locate the template for the front suspension
cut outs on the second side skin. Eventually get it in place even though the
front edge is not in line with the front edge of the skin (which it should be).
I then cut the shapes in the skin. This took the best part of two days on the
first skin. It now takes 2 hours and is a far better job than the first. Lynne
looks in to say that she's up and is going for a bread. I catch her when she
gets back. We're going to fix the second side skin.
I get the parts to be mated rubbed down (roughened up would be a better
description). I mix the glue with the hardener and apply it to the top edges.
The chassis is now the right way up, when we did the first side it was upside
down. We lift it into place and Lynne's job is to get any surplus glue off the
panel. We have methanol for this.
I stick my big, fat, stumpy fingers on the glued surface and the stuff is all
over the place!
I start shouting at Lynne to "Get it off, quick. Come on - pour the
bloody stuff on the rag (a pair of my old knickers so it's large enough!). Hurry
up!" etc., etc.
I snatch the cloth and bottle and start wiping furiously. The problem is that
what you wipe off with the first wipe, reapplies itself on the second. "Get
the lamp so I can see" I bark at my poor long suffering wife. She gets the
lamp and proceeds to shine it right in my eyes. I start shouting again.
"It's got a bloody shield! Turn it round." So she does. It's now right
in my eyes and the shield is doing a great job of throwing a shadow on the
panel. This goes on for a few minutes more but I eventually get the excess
off the panel.
Then I realise I've forgotten to apply glue to the lower edge. I lay on the
floor and knife it on. I think there's more on the surface of the panel than on
the edges where it should be. This stuff sets in 20 minutes and I'm rubbing like
mad to get it off before it's too late.
I'm sure Lynne thinks I've finally gone beyond help as I'm pouring methanol
all over a pair of pants, rubbing a panel like I'm giving it a hand job at the
same time as shouting and swearing at it.
Sigh, it's all off the visible surfaces. I then rub the underneath edge clean
but I'm too knackered to get down on the floor to look up to see if its all off.
It FEELS smooth so it'll have to do. If anyone wants to lay on the floor to
inspect it there welcome. If I see them doing this I'll kick them!
Lynne leaves and I'm sure I hear a littel chuckle as she walks out. Can't
blame her, but I'm sure she realises that it's myself I'm annoyed with. I'll
grovel with apologies later.
I clamp the top rail every few inches and then lunch is ready.
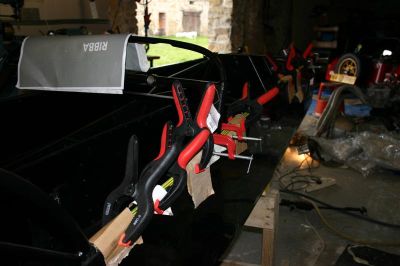 A well clamped side skin.
After lunch I fit the inner and outer 1/4 panels. More gluing but much easier
with a small panel.
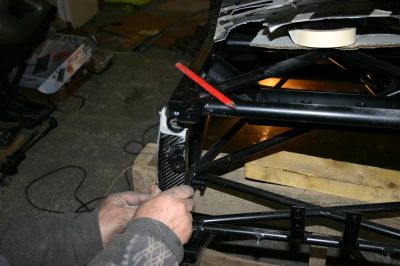
 Remember the problem flitch panel? Well I eventually decide to glue it on
with a polymer and clamp it together.
Remember the problem flitch panel? Well I eventually decide to glue it on
with a polymer and clamp it together.
I then have to lie under the front, apply masking tape to the lower edge of
the side skin, mark it every 1.75" and drill and rivet it. This
side doesn't bulge as much and the flitch fits OK. Still it's totally knackered
me as I still cant lay flat on my back due to my ribs not fully healed.
Trying to drill and rivet when laying on ones side is not easy.
I should be fitting the rear panel but it'll have to wait till I
regain some strength. So I fit the pedals, master cylinders and brake pipes
back. I modify the clutch pedal stop. The new arrangement is better because it
can be adjusted from outside the pedal box.
 Master cylinders in place. The thread sticking through is the clutch pedal
stop.
Master cylinders in place. The thread sticking through is the clutch pedal
stop.
 Steering rack in place. Isn't the Gold lettering nice? (Sad, or what)
It's now gone 7pm and time to go inside, shower and change to watch Antiques Roadshow.
As I come into the house two of the cats are playing with something by the pond.
 Ooh look at me, I caught a mouse. Well actually this is Louis who couldn't
catch a cold. Rachmaninov caught the mouse, she's about 9 months old and acts
it. However Louis lays claim.
Ooh look at me, I caught a mouse. Well actually this is Louis who couldn't
catch a cold. Rachmaninov caught the mouse, she's about 9 months old and acts
it. However Louis lays claim.
Oh, all right. How do you burn a hole in the car, interior back panel. Well
it's like this. Last year I found a small leak of fuel from the corner of the
fuel tank. It was so cold the petrol that had weeped out had frozen! So I took
the tank out drained it and welded the seam up. Before putting the tank back I
decided that I should re-braze the top diff mount which had broken away again. I
get Lynne all dressed up warm and arm her with a bucket a sponge and ask her to
sponge down the carbon back panel to stop it catching fire. Do I need to go on?
Next thing I know is a demented women dancing around screaming "It's on
fire, It's on FIRE!".
I threw the bucket of water over her.... no I didn't, just felt like it, I
threw the water over the burning panel.
So that's how you set fire to your carbon panels.
Monday 26th March: Apologies to Quirin for a late posting, sorry I
won't do it again. (want to bet!)
Started the morning by noticing that the track was way out. Then realised
that the new track control arm doesn't need the extension piece for the wide
track wishbones. I'll have to get Caterham to send an arm for the other side so
it matches. Then unwrap the new anti roll bar. It's in a nice plastic bag and is
just that - an anti roll bar. No plastic ball joints on the ends, no rubber dust
cover, no mounting brackets just a roll bar. And to add insult to injury, I've
ordered the wrong size! I assumed i had the standard 1/2" but this one is
9/16". I then remember changing it 2 years ago.
DAMN!
So onto to Tony at Caterham parts. he's going to send me a 5/8" bar,
ball joints, dust covers and matelastic mounts. Then ask him for the track rod
arm and explain why. OK, he says but they come in a kit with both sides (why
doesn't the ARB come as a kit - think about it). You can see the light come on
above my head. "Oh, in that case forget it, I must have one". back
into the workshop and search the parts bin. (exactly what it says a bin full of
parts I've not used, I'll sort it out one day) There at the top is the plastic
bag (I reckon Caterham could reduce parts prices by 15% if the downgraded the
plastic bags) is a track control arm.
Off with the rack. If this rack comes off and back on many more times I'll be
able to click my fingers and it will remove itself!
Change the track control arm and refill with oil (all the previous gear oil
is now in a big puddle on the floor in front of the bench). Refit the rack.
Then carry on fitting the front suspension. Problem I have here is that
Caterham are sending me new felt seals for the front hub. And I cant fit the
wing stays as I want to bond the bighead clips to the new wings on the
bench. And I can't do the top link up until I set the camber. And I can't do the
track rod end up until I set the track. And I think I was taught not to
start a sentence with "and".
OK, the front suspension is on but looks like a prick in a shirt sleeve
(someone may have to explain that to Quirin).
 Front suspension on. Less the hub and ARB. Oh, and everything's loose as it
it has to be undone later
Front suspension on. Less the hub and ARB. Oh, and everything's loose as it
it has to be undone later
Now to revisit that rear panel. Get Lynne out and we have another, longer
look at it. It's about an inch short where it supposed to go around the upright
just behind the back panel. Well it's still out. It hasn't grown longer since we
last looked at it a few days ago. I'll leave it for later. With a rope and a big
jerk (what I did to the diff, not me!) i get the diff in place. Then centre it
and with the little angels help get it bolted up. Continue for the last hour of
the day getting the rear suspension and brakes on. It's like a Chinese puzzle!
Turns out the brake mounting brackets have got mixed up and I'm trying to work
out why it won't fit. Give up for the night. Come inside and have dinner then
phone Richard to discuss the rear panel. After a long discussion and a trip to
the workshop we work out my chassis has the uprights 3/4" further
forward than Richards chassis. OK, that explains it. Now what are we going to
do. I decide that I'll sort it out by making extension panels, otherwise known
as flitch plates. It's this or put Richard under pressure in making a new rear
panel. he's already decided to make a universal panel which is 2" longer
and doesn't wrap around the uprights.
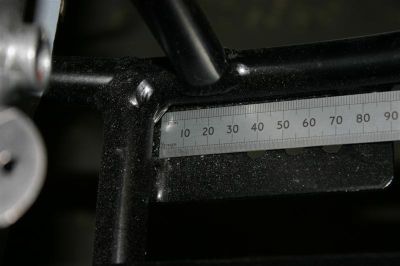 Measuring! I only took the photo because I didn't have my glasses on me and
couldn't read the rule!
Measuring! I only took the photo because I didn't have my glasses on me and
couldn't read the rule!
By this time it's 10:00pm here and I'm too knackered to write this up hence
being a day late.
Tuesday 27th March: Carry on with the rear suspension whilst Lynne
goes to school to learn French. She's doing very well and it won't be long
before she can hold a conversation. I gave up last year! I can't speak English
proper so what chance learning French!
First job today is to make longer bolts for the rear caliper mounts. I've
been concerned that they only have 4 threads into the ali bracket so an hour on
the lathe and 4 nice new, longer bolts. Then spend the next hour centralising
the caliper. I don't remember having to put 5 washers in the get it central.
 The rear suspension fully assembled except for the "A" bracket
which yours truly is putting on now whilst the "boy" takes photos.
The rear suspension fully assembled except for the "A" bracket
which yours truly is putting on now whilst the "boy" takes photos.
Finished the rear suspension and drive train by bolting up the prop shaft. At
least this time I did remember to put it into the tunnel before fitting the
diff. I suppose it's the sort of mistake you only make once!
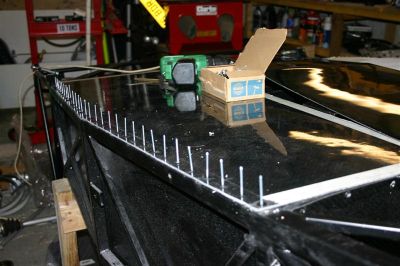
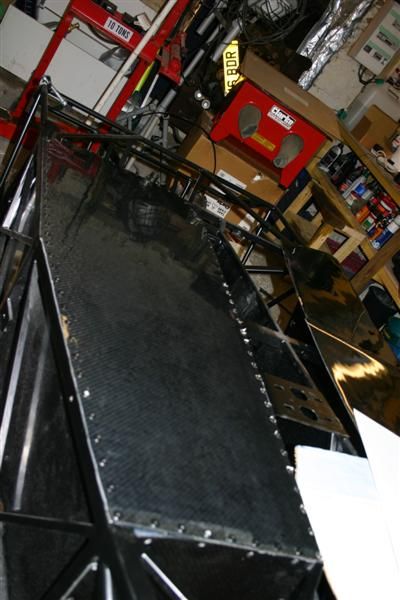
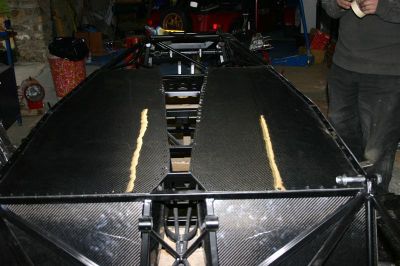
Fortunately the new floor panels come as oblongs and need cutting to shape. This is good as it means I have two triangular pieces I can use as flitch plates for the rear panel.
 Trying the new flitch plates out for size. They'll do.
OK, flitch plates in place, held in with 2 rivets and I'm ready to fit rear
panel. Lynne's doing something to a dead chicken so have to wait for my little
helper. (No I do not have a photo of a dead chicken).
We cut off the "wrap around" edges on the rear panel, roughen the
mating surfaces with the linishing cloth and apply the glue (have mixed it
first).
The rear panel goes on like a dream..... until it slips off and we have glue
all over it. No real problem, reposition it and put a couple of clamps on to
hold it. Lynne cleans of the glue and I fit the rest of the clamps. Lynne leaves
to continue her affair with a dead chicken.
I drill and rivet the flitch panel to the upright and the rear panel to the
flitch. Even though it's glued better have a belt and braces than a flapping
rear panel.
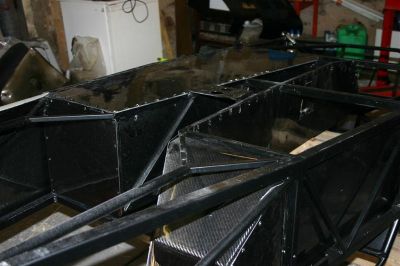
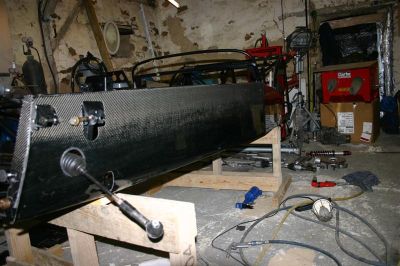
 Rear panel on at last. Only the two boot floor panels and the tunnel top to
fit now. The first 100% carbon bodied 7.
Rear panel on at last. Only the two boot floor panels and the tunnel top to
fit now. The first 100% carbon bodied 7.
We're going to the bar tonight so an early night. Start packing up at 17:30.
Just as I'm leaving the workshop I notice I still have 2 holes to drill in the
front facing flitch panels. Pick up the air drill and drill the first hole
(these are for the anti roll bar mounting bolts.) Then drill the second hole and
my thumb.
Lynne applies a nice bandage to the hole in my thumb. It would be really good
if it was over the hole and not across my nail. You know if she was blonde it
would explain everything.
And lastly, let me tell you that the frogs have just started. If it's like
last year we have 6 weeks of frogs mating. Noisy.
Wednesday 28th March: At this point we lost our internet connection.
We had asked a friend who speaks French to ring France Telecom and get our ADSL
line moved from one line to the other so we could cancel our second line which
was used for our original dial up connection. This was about 5 weeks ago and as
nothing seemed to happen we assumed the normal French service applied, ie,
nothing. The line dropped just after a huge clap of thunder so we assumed that
the storm was the cause. To make a long story not so long (makes a change for
me!) FT had put ADSL onto our house phone number but not taken it off the dial
up line. The engineer came on Saturday morning and tested the line OK. My son
was coming next Thursday so I asked him to bring a spare router. Our router was
only 6 months old and was trying to make the connection so I assumed it was OK.
Turned out to be faulty. I'll continue the saga as I catch up. I phone MOG to
find out where the wings and nosecone are. The girl on reception tells me
they'll be finished by Friday - WEEK!. As they should be here by now I'm not
happy. Joachim is away until next Tuesday so I plan to ring him then.
So, what did I do today (as I type this Saturday 7th April). Well I mounted
the ignition amplifier and coil on the new footwell. Then fitted the fuel pump
to the back of the rear panel. The rear loom went on next followed by the new
fuel pipe to the pump. I then refitted the brake pipes and made up a new pipe so
as to move the bias adjuster to under the bonnet rather than in the cockpit . As
I made the last flared end the pipe flaring tool broke! I planned to order a new
one but as it turned out with no internet I will be doing that after Easter now. Next
I tightening the front suspension and fitting the front brake pipes through
the side skins. I missed getting a picture of Lynne hanging on a 10 foot length
of wood to press down on the top wishbone whilst I tightened the top ball joint.
Finished the day by slipping the engine in. Yeah right! I had tried putting
the gearbox on the engine twice when both were on the floor. So perfectly lined
up were the centre plates that the box just fell on. Would the bloody thing go
on when getting it in the car. I pushed and pulled shouted and swore. I couldn't
get the angle right. I had the car too straight so I couldn't get a sharp angle
which is needed to get the crank pulley behind the front chassis cross brace. So
in the middle of getting the engine in I'm letting the back of the car down and
moving the front axle stands to lower the front as well. Eventually it just goes
"plop" and slides in. I get the front engine mounts on and call it a
day. I'm exhausted! The quicker the treatment for my blood condition starts the
better. I'm so tired I can't even pick my nose without panting hard.
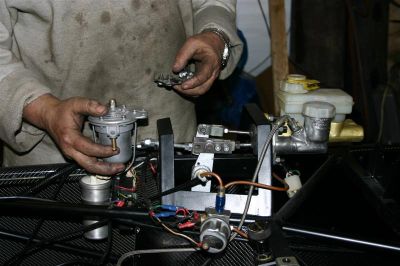 Trying the bracket for the fuel filter. The coil pack can be seen below it.
 The coil pack with the bracket for the fuel filter above it.
 The gearbox awaits ......
 .... the engine
 Fitting the engine mounting.
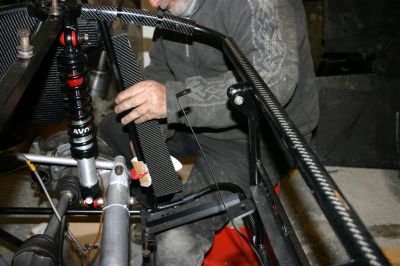
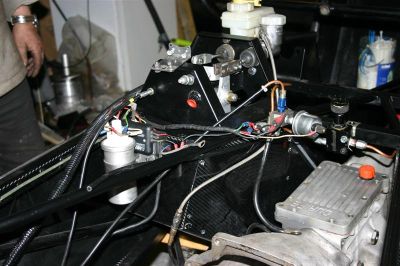
Thursday 29th March: Today sees the engine bits and pieces all refitted and the steering column fitted and after much head scratching the fuel filter position decided on and fitted. Then to the battery.
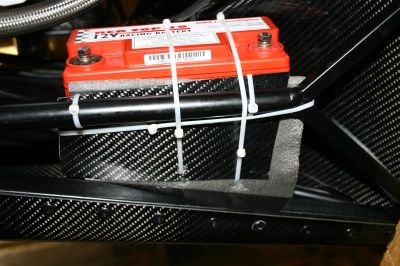 The battery with carbon tray and foam underlay. The panel with the row of
rivets is the outer chassis member, the panel on the right is the footwell.
The battery with carbon tray and foam underlay. The panel with the row of
rivets is the outer chassis member, the panel on the right is the footwell.
Last job for today is to fit the oil tank. This take time as I need to get
the position spot on so the new sight glass can be fitted by drilling holes in
my new shiny, undented tank.
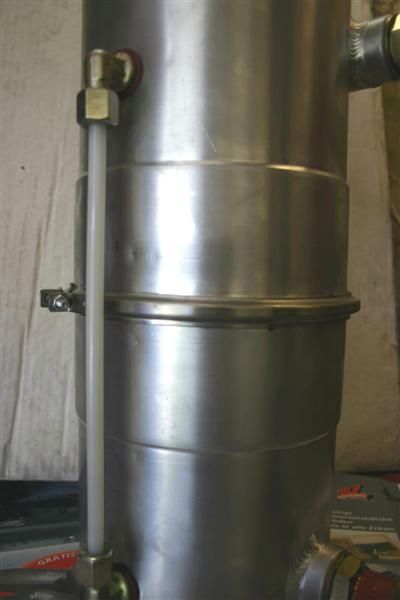 The oil tank with sight glass fitted. The little dents are the litre marks.
 And the FULL mark.
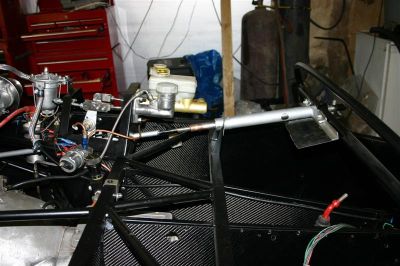 The steering column. Just thought you'd like to see it.
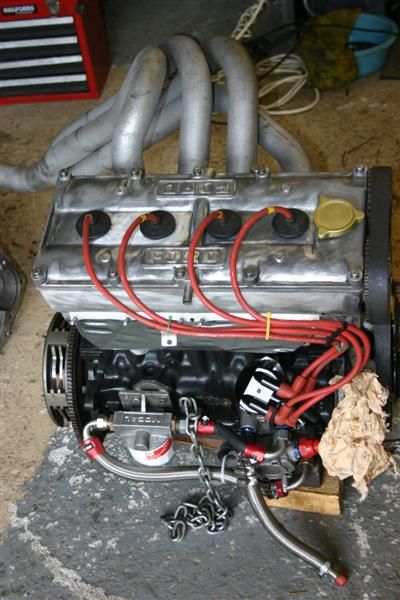
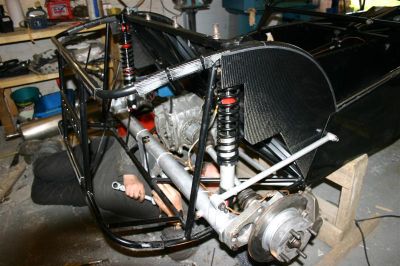
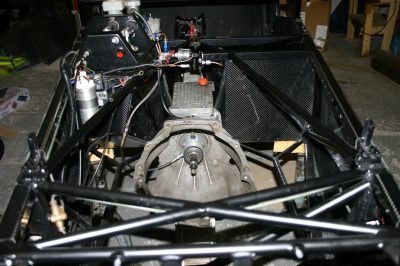
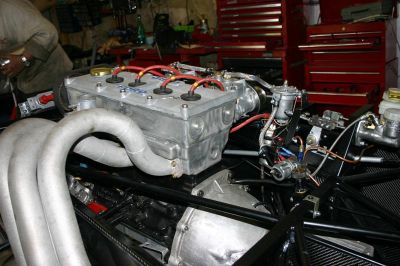 Engine fully installed.... but not running - yet.
Lynne goes to the local garage to collect the wheels which should have the
tyres back on. She returns with 2 with tyres but the other two are found to be
damaged on the sidewalls and the tyre fitter refuses to refit them. He's not
wrong. I can almost push my fingers through the cuts on the sidewalls. i don't
know how I missed the damage some weeks ago when I first looked at them. I'll be
onto the insurance engineer after Easter. In the meantime I ring Caterham and
organise 2 new tyres to be given to Arch. Luckily Bruce is coming to France over
Easter and can bring them over for me. He's also bringing me a new roll bar as
my old one will not fit the new rear end of the chassis.
OK, lets fire her up. First attempt - nothing. Then realise I've not
connected the fuel pipe to the tank. Do that and then remember I haven't put any
petrol in. About a gallon gets poured in and we try again. Still nothing.
Check spark - none. Test everything and check wiring. At this point I get one of
those moments that I wish my leg was fitted 180 degrees round the other way. So
I could kick myself up the arse! I've got the ignition wires on the wrong way
round. Not entirely my fault because the white wire with black trace has no
black trace - it's rubbed off. I put this on the +side of the coil which
I suspect has burnt the amp out. I mess about for a half hour and then give up
and go in for a glass or 3 of wine. I'll sleep on the problem.
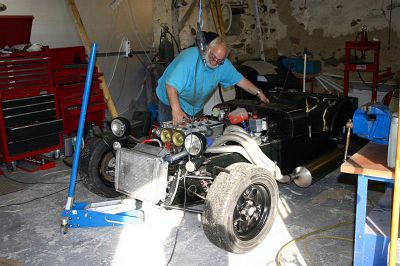 Trying to start an engine with a burnt out ignition amplifier.
Friday 30th March: Most of today is spent manufacturing new seat
brackets. Lynne says her seat needs to be raised as she couldn't see over the aero screen.
She works out the seat need to be 4" higher. I make two brackets which
raise the passenger seat by 4". Looks ridiculous to me but she'll try it in
the morning
 A seat bracket. Hanging up to dry having been brazed and bent then painted.
I'm getting concerned about all this paint going on. The chassis will be heavier
than before and what with the paint I suspect I will be weight neutral after the
savings of the carbon.
A seat bracket. Hanging up to dry having been brazed and bent then painted.
I'm getting concerned about all this paint going on. The chassis will be heavier
than before and what with the paint I suspect I will be weight neutral after the
savings of the carbon.
I cut a carbon panel from the old rear panel to fit on the tunnel top under
the dash and cut the hole in the section that the gear lever goes through and
glue on the new gaiter.
 The front section of the tunnel top with the loom plug poking through.
Only tomorrow left to finish if I'm going to have an April Fools blat. NO
CHANCE! I'm still without the front anti roll bar, the wings and nose
cone, the front hub felt seals and the top rear shock absorber bolts.
Oh well, never mind, I'll cut the gear lever hole in the second section of
the tunnel top and glue the gaiter in.
Saturday 31st March: In the morning I remove the passenger seat
to lower it 4". Lynne looks like shes sitting on the car rather than in it.
The new arrangement, with the 4" stilts is fine, she can see over the aero.
I suspect the seat is mor upright than before so she is sitting with her head
higher and her feet not reaching the footwell. As it's a short footwell
this proves that good things come in small packages. (That should be good for a
brake bleed later)
Now, on to cutting the holes in the dash. I need a hand with this and do some
before Lynne has to do something else. I can't remember what it was but it can't
be as important as cutting ones holes in a dash - can it?
Just get her to bleed the clutch for me. It's really funny watch her try and
reach the pedals. She has to lay right down. When I try and get her to drive the
car she says she can either reach the pedals or see over the screen - not both
at the same time.
I get the spare wheels out the barn, clean the spiders off and wash them
down. Pump up the tyres and fit them. I'll need to cut some of the wheel nuts
down a bit as the new ones I made but never used (for this set of wheels) are
too long. But that can wait for now. The car is gracefully lowered to the
ground.
Continued on "April 2007"